

The broiler industry demands precision to ensure optimal growth and health. This guide, adapted from the Hubbard Broiler Guide, outlines essential practices for managing broiler farms effectively. It covers farm setup, equipment standards, house preparation, chick delivery, and flock management to achieve high performance.
Following the “all-in, all-out” principle is critical for disease control and uniformity. Proper site selection, hygiene protocols, and equipment standards enhance animal welfare and productivity. This article provides practical steps for growers to maintain a healthy and efficient broiler operation.
Adhering to strict biosecurity measures prevents contamination and disease spread. The guide emphasizes standardized housing, precise environmental control, and careful chick management. These practices ensure broilers thrive in both temperate and hot climates, meeting industry and regulatory standards.
By implementing these guidelines, growers can optimize flock performance, reduce mortality, and improve feed conversion ratios. The article details key procedures, from disinfection to ventilation, to support successful broiler farming. Each section provides actionable insights for consistent results.
Read Also: How to Grow, Use and Care for Whiteedge Flatsedge Grass (Cyperus flavicomus)
Farm Setup and Biosecurity

Effective farm setup is the foundation of successful broiler management. Selecting an appropriate site and maintaining strict biosecurity measures are crucial to prevent contamination. The “all-in, all-out” principle ensures one age and breed per site, promoting uniformity and health.
Proper layout and hygiene controls protect flocks from external threats. A well-designed farm minimizes disease risks and supports efficient operations. Growers must prioritize biosecurity to maintain flock health and meet industry standards for broiler production.
A. Site Selection and Layout
1. Location Choice: Choose a site away from contamination sources like other farms or industrial areas. This reduces disease transmission risks and ensures a clean environment for broilers.
2. House Layout: Design houses to minimize external exposure. Orient buildings to avoid direct wind or pollutant entry, enhancing biosecurity and maintaining a controlled environment for the flock.
3. Biosecurity Barriers: Install physical barriers like fences and restricted access zones. These prevent unauthorized entry and reduce the risk of introducing pathogens to the farm.
B. Hygiene Protocols
1. Changing Room: Provide a changing room at the farm entrance. All personnel must change into clean uniforms to prevent bringing contaminants into the broiler houses.
2. Shower Facilities: Install showers where possible. Requiring showers for everyone entering the farm adds an extra layer of protection against external pathogens.
3. Disinfection Procedures: Thoroughly clean and disinfect houses and equipment between flocks. Follow strict protocols, detailed on page 56 of the original guide, to eliminate residual pathogens.
4. Resting Period: Allow a minimum two-week resting period after disinfection. This ensures no residual contaminants remain before introducing a new flock to the house.
Equipment Standards
Standardized equipment ensures optimal rearing conditions for broilers. Industry standards for insulation, health, and environmental control are consistent across all houses. These standards may vary by country, so always follow local regulations if they differ from the guidelines below.
Proper equipment setup supports animal welfare and productivity. From heating to ventilation, each component plays a critical role in maintaining a stable environment. This section outlines specifications for temperate and hot climates to guide growers.
A. Heating Requirements
1. Temperate Climate: Use 80–100w/m² for whole-house heating. Install four thermometers per 1,000m², linked to ventilation controls, to monitor and maintain consistent temperatures.
2. Hot Climate: Adjust heating to 1,400w for 600–700 chicks in local brooding setups. Ensure thermometers are strategically placed to regulate temperature effectively in warmer conditions.
3. Local Brooding: In poorly insulated houses, use 3,500w heaters for 700–800 chicks in temperate climates, adjusting based on insulation quality and external temperatures.
B. Water Systems
1. Temperate Climate Drinkers: Provide one round drinker per 100 broilers, 2 cm trough per broiler, or one nipple per 10–15 broilers. Maintain constant water pressure across lines.
2. Hot Climate Drinkers: Increase to one round drinker per 60 broilers, 3 cm trough per broiler, or one nipple per 6–10 broilers to meet higher water demands.
3. Water Pressure: Ensure nipples deliver consistent pressure along the entire line. Regularly check and adjust to prevent leaks and ensure adequate water access.
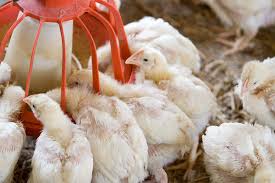
C. Feeding Systems
1. Temperate Climate Feeders: Use 15m of chain feeders or one pan per 60–70 broilers per 1,000 birds. Control feed quantity and distribution for uniform access.
2. Hot Climate Feeders: Increase to 25m of chain feeders or one pan per 40–50 broilers. This accommodates higher consumption rates in warmer conditions.
3. Feed Distribution: Implement systems to monitor and control feed quantity. Even distribution prevents competition and ensures all broilers receive adequate nutrition.
D. Lighting and Ventilation
1. Lighting Standards: Use 5w/m² incandescent or 60 lux fluorescent lighting with dimmers. Follow a light program to optimize growth and activity in broilers.
2. Ventilation Power: Provide 6m³/kg live weight/hour. In hot climates, use tunnel ventilation with a 2 m/sec air speed to maintain airflow and temperature control.
3. Cooling Systems: Install fogging (600 liters/hour, 110–120 bars, 60 nozzles) or pad cooling (10 cm thick, 1.5–2m² for 10,000m³/hour) to manage heat in hot climates.
House Preparation
Preparing the house before chick arrival is critical for a successful flock. After cleaning and disinfection, all equipment and litter must be in place three days prior. Proper preparation ensures a comfortable and healthy environment for the chicks.
The type of litter, heating, and watering systems significantly impact early chick development. This section details how to organize the house and manage preheating to eliminate risks like condensation and bacterial contamination.
A. Litter Management
1. Litter Types: Use dry, non-corrosive materials like shavings, chopped straw, or rice hulls. These provide insulation, comfort, and good absorption for chick health.
2. Litter Thickness: In temperate climates, use 2–5 kg/m² of shavings or straw. In winter on dirt floors, increase to 5 kg/m² to prevent condensation.
3. Pre-Warming Litter: Pre-warm litter in winter to eliminate moisture. This prevents anaerobic fermentation and ammonia buildup, which can harm chicks.
B. House Organization
1. Insulation Levels: Assess house insulation to determine heating needs. Well-insulated houses can use 80–100% of the space, simplifying work organization.
2. Heating Systems: Choose whole-house or local heating based on insulation. For poorly insulated houses, start chicks in the center with fences 2–3m from walls.
3. Watering Systems: Install round, nipple, or trough drinkers. For 1,000 chicks, use 40–50 nipples, 5 minicups, or 6–7m of paper under nipples.
C. Preheating and Final Disinfection
1. Preheating Duration: Preheat for 36–48 hours to reach 28–30°C at chick level. This eliminates condensation between litter and floor, preventing health issues.
2. Final Disinfection: Perform final disinfection 24 hours before chick arrival at 20–25°C. Use thermo-nebulisation or formalin gas per supplier instructions.
3. Ventilation Post-Disinfection: Ventilate at 500m³/hour per 1,000m² to remove residual gases. Ensure compliance with local health and safety regulations.
Read Also: How To Grow, Use and Care For Threeawn Grass (Aristida Spp.)
Receiving and Starting Chicks

Receiving chicks requires strict biosecurity and careful handling to ensure their health. Proper delivery and placement set the stage for flock success. Environmental factors like temperature and humidity must be closely monitored to support chick development.
The first days are critical for establishing feeding and drinking habits. This section covers delivery protocols, chick quality assessment, and environmental adjustments to optimize early growth and well-being.
A. Chick Delivery
1. Biosecurity Measures: Delivery personnel must wear clean uniforms and boots. Drivers are not allowed inside the house to prevent contamination.
2. Chick Placement: Spread chick boxes evenly in the brooding zone. Do not stack boxes to avoid stress and overheating during placement.
3. Post-Delivery Tasks: Perform treatments like spray vaccinations quickly. Remove and burn cardboard chick boxes immediately to reduce contamination risks.
B. Chick Quality and Management
1. Quality Indicators: Assess chicks for activity, chirping, absence of respiratory issues, and healed navels. Weigh 200 chicks for accurate average weight.
2. Flock Separation: Separate chicks from young breeders to improve uniformity. Smaller chicks may struggle to access feed and water otherwise.
3. Flock Records: Maintain records of hatch date, chick origin, mortality, body weight, feed, water consumption, and vaccinations for health and regulatory compliance.
C. Environmental Control
1. Temperature Monitoring: Measure temperature at chick level (31–33°C). Chicks cannot regulate body temperature below this, risking health issues.
2. Behavioral Observation: Watch chick behavior (position, chirping, feeding). Adjust equipment based on leg temperature, crop fill, and environmental readings.
3. Ventilation and Humidity: Start ventilation at 0.8–1m³/kg live weight/hour. Maintain 55–60% humidity for days 0–2, adjusting as chicks grow.
Growing and Finishing Period
The growing and finishing phase determines the flock’s technical and economic outcomes. Maintaining biological and social equilibrium is essential as body weight and resource demands increase. Proper ventilation, humidity, and ammonia control are critical for success.
This phase requires precise environmental management to support rapid growth. The section below outlines key parameters for ventilation, humidity, and feeding to ensure optimal broiler performance.
A. Biological Equilibrium
1. Oxygen Needs: Broilers require 0.03–0.13m³/kg live weight/hour of oxygen. Ensure ventilation meets these needs to support metabolism and growth.
2. Gas Control: Keep CO2 below 0.1% and NH3 below 15ppm. Excess ammonia causes irritation, reduced growth, and increased disease susceptibility.
3. Water and Feed Balance: Monitor water and feed consumption. High water wastage and feed intake increase humidity, requiring careful management.
B. Ventilation and Air Circulation
1. Ventilation Rates: Adjust ventilation from 0.8–6m³/kg live weight/hour based on age. Use timer fans and observe chick behavior to fine-tune settings.
2. Air Speed Control: Maintain air speed below 0.1m/s for young chicks to avoid chilling. Increase to 2m/s for fully feathered broilers in hot conditions.
3. Airflow Monitoring: Use ribbons to track air movement. Ensure doors close firmly, indicating proper house pressure for effective ventilation.
C. Feeding Strategies
1. Feed Clean-Up: Start short feed clean-up periods (<1 hour) in week three to stimulate consumption and ensure fresh feed intake.
2. Growth Control: Use longer clean-up periods to slow growth if needed. This helps manage weight and improve feed conversion ratios.
3. Feeder Access: Ensure chicks transition smoothly to automatic feeders. Adjust feeder height and access time based on chick size and uniformity.
Frequently Asked Questions
1. Why is the “all-in, all-out” principle important?
The “all-in, all-out” principle ensures one age and breed per site, reducing disease spread and improving flock uniformity for better management and performance.
2. How often should houses be cleaned and disinfected?
Houses and equipment must be thoroughly cleaned and disinfected between flocks, followed by a minimum two-week resting period to eliminate pathogens.
3. What is the ideal litter thickness for broilers?
In temperate climates, use 2–5 kg/m² of litter. In winter on dirt floors, increase to 5 kg/m² to prevent condensation and ensure chick comfort.
4. How should ventilation be adjusted for young chicks?
Start with 0.8–1m³/kg live weight/hour to remove toxic gases. Keep air speed below 0.1m/s to avoid chilling young chicks during brooding.
5. What are signs of a healthy chick?
Healthy chicks are active, chirp moderately, have no respiratory issues, and show healed navels. Weigh 200 chicks to confirm uniformity and weight.
6. How can ammonia levels be controlled in the house?
Control ammonia by maintaining humidity below 70%, using proper ventilation, and adding 200g/m² of superphosphate every five days until day 28.
7. Why is preheating the house important?
Preheating to 28–30°C for 36–48 hours eliminates condensation, preventing ammonia buildup and health issues like nephritis or diarrhea in chicks.
Do you have any questions, suggestions, or contributions? If so, please feel free to use the comment box below to share your thoughts. We also encourage you to kindly share this information with others who might benefit from it. Since we can’t reach everyone at once, we truly appreciate your help in spreading the word. Thank you so much for your support and for sharing!