
Raising poultry successfully requires more than just buying chicks and hoping for the best. You need proper housing that keeps your birds safe and comfortable, plus the right equipment to make daily care manageable. This guide walks you through the basics of building or choosing a poultry house and the essential equipment you’ll need to get started.
Getting the housing right from the start saves you money and headaches down the road. A well-built poultry house protects your birds from weather, predators, and disease. The right equipment makes feeding, watering, and cleaning much easier. Whether you’re raising chickens for eggs, meat, or both, these fundamentals stay the same.
Many new poultry farmers make the mistake of cutting corners on housing and equipment. They think they can save money with makeshift solutions. But poor housing leads to sick birds, low production, and higher costs over time. Taking time to build properly or invest in good equipment pays off through healthier birds and better results.
Read Also: Production Practices for Poultry Operations
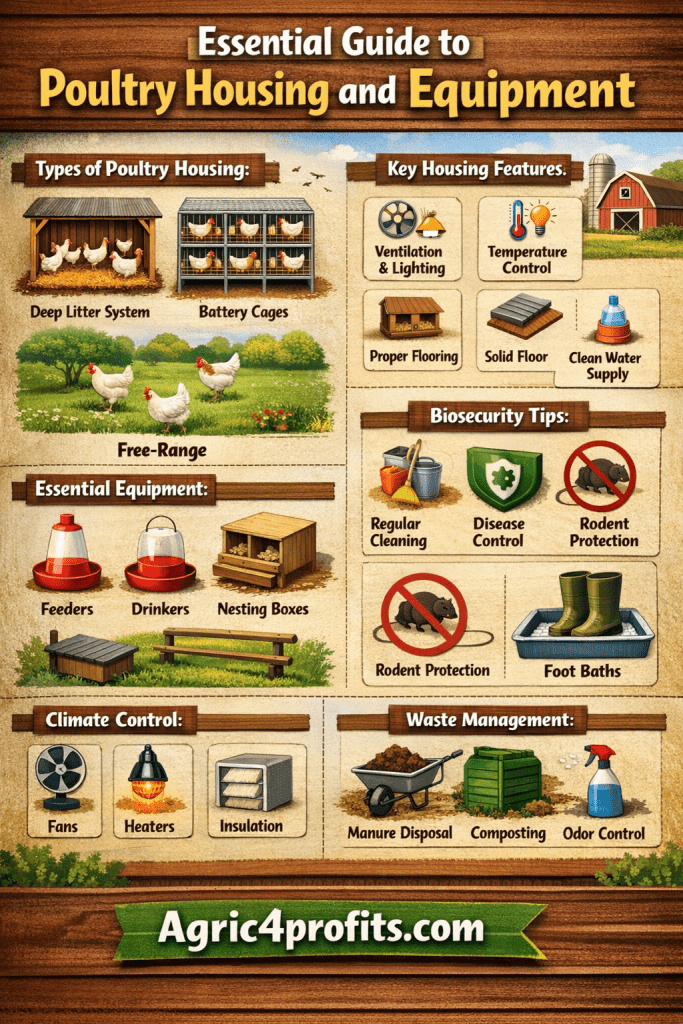
1. Housing Requirements for Poultry
Your poultry house needs to do one main job: keep heat in so the room stays warm. This matters most for young chicks who can’t regulate their own body temperature well. When you’re setting up housing for brooding, think about heat conservation first.
Location matters too. Keep houses for young chicks at least 50 meters (150 feet) away from older birds. This simple step cuts down the risk of passing diseases from older stock to vulnerable young ones. Disease can wipe out a whole batch of chicks quickly, so this distance is worth maintaining.
When you start building, pay attention to these key parts:
a. Foundation and Wall Construction
You need a solid foundation that lasts. Dig down between 0.5 to 0.7 meters (about 1.5 to 2 feet), or deeper if your soil is loose or unstable. Pour a concrete layer about 10 centimeters (4 inches) thick at the bottom. This creates a basement that your blocks will sit on.
Termites can destroy a poultry house from the ground up. Before you start laying blocks, pour an anti-termite chemical on top of the concrete basement. It’s a small extra step that protects your investment.
Wall height depends on what type of birds you’re raising. For growers and broilers, make the walls half-open-sided. For layers, the solid wall should be between one-third to one-half of tthe otal height. If you’re planning to use cages, keep the solid wall at only one-third of the total height to the eaves.
Plaster the inner walls. It makes cleaning easier and helps prevent parasites from hiding in cracks. The open portion of the wall needs to be covered with chicken wire mesh, usually 1/2 to 3/4 inch in size. Total wall height from floor to eaves shouldn’t go above 1.9 meters (6 feet).
b. Roofing Materials
Zinc and aluminum roofing sheets work well for poultry houses. They’re affordable and last a decent amount of time. Asbestos is the best option because it doesn’t absorb as much heat, but it costs significantly more.
Skip thatch roofing. It might seem cheap at first, but it brings problems. Maintenance is constant, parasites love hiding in it, and it’s a fire hazard. You’ll save yourself trouble by avoiding it entirely.
Make sure your roof overhangs by about 0.9 meters (3 feet). This keeps rain from blowing in through the open sides of the wall. On the side that faces prevailing winds and rain, you might want to extend the overhang even more.
c. Door Design
Doors should be wide, at least 0.9 meters (3 feet). You need to move staff, equipment, birds, and manure in and out easily. A narrow door slows everything down and makes awkward loads dangerous.
Put a footbath with disinfectant at every door. You can build it into the doorstep or use a movable container. Either way, everyone who enters should step through it. This simple habit keeps diseases from spreading into your flock.
d. Storage Space Planning
Don’t forget storage space inside the house. You need somewhere to keep equipment, feed, and other supplies that should stay nearby. Make this storage area about one-tenth of your total house size. It might seem like a lot, but you’ll use every bit of it.
Read Also: Principles of Poultry Production and Types or Stains of Poultry
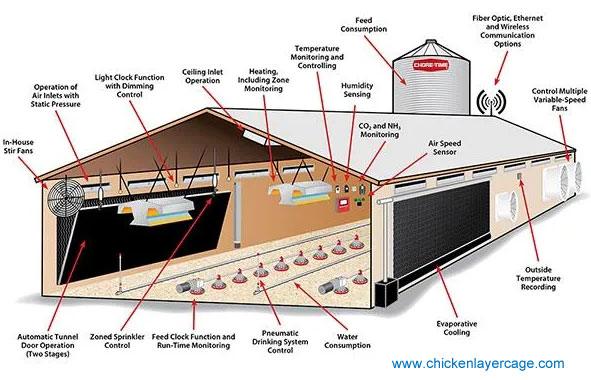
2. Essential Poultry Equipment
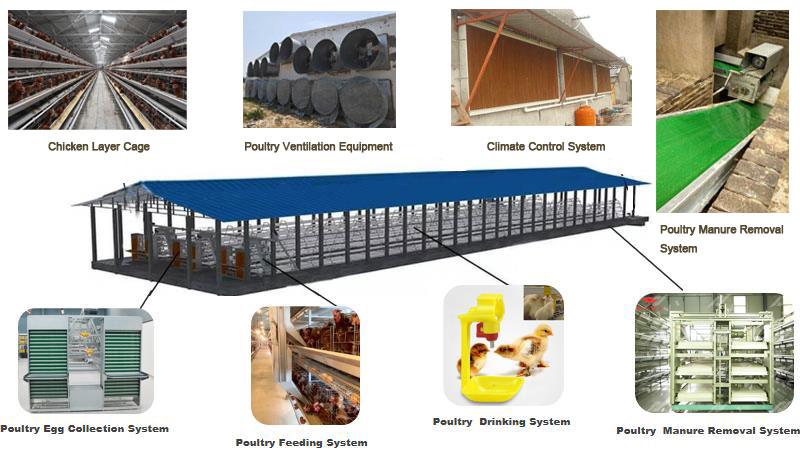
Good equipment makes daily poultry care manageable. You’ll need items for heating and lighting, feeding and watering, handling manure, and collecting eggs. You can make some of these locally or buy them from dealers.
When buying equipment, think about three things: cost, how long it will last, and how easy it is to use. The cheapest option often breaks quickly. The most expensive might have features you never use. Find the balance that works for your operation.
a. Brooder Boxes
Brooder boxes keep heat concentrated in a small area when you use lamps for warmth. You can make them from wood or metal, or improvise with thick cardboard or wooden boxes.
Every brooder box needs holes at the top. These let fumes escape, which matters especially with kerosene lamps. Poor ventilation can harm or kill chicks.
Space is important. Give each chick about 7 square centimeters under the brooder. A box measuring 1.25 by 1.25 meters (4 by 4 feet) holds up to 400 chicks comfortably.
b. Heat Sources
Warmth is critical for day-old chicks. When the environment gets too cold, chicks die easily, especially in groups. You have several options for heat: kerosene lanterns, electric lamps, charcoal, gas brooders, or hot water pipes.
Whatever heat source you choose, keep it away from direct contact with chicks, litter material, and brooder boxes. Safety comes first.
For small-scale operations, two to three kerosene lamps on the floor or two 100-watt bulbs hung about 20 centimeters (8-10 inches) above the floor will heat and light up to 75-100 chicks.
Research shows that in Nigerian conditions, brooding with kerosene lamps costs less than other heat sources. It does require more attention and care, but the savings can be significant for small farmers (Federal Ministry of Agriculture and Rural Development, 1985).
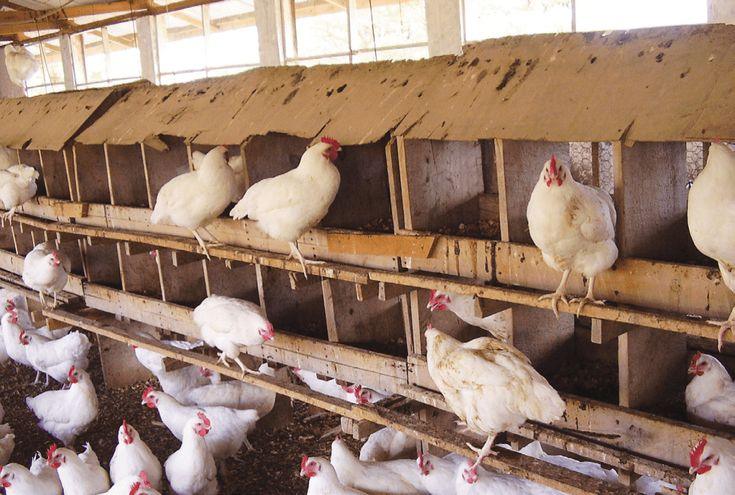
c. Feeding and Watering Troughs
Feeders come in two main shapes: longitudinal or conical. For young chicks from 0-4 weeks (broilers) or 0-6 weeks (pullets), you need 2.5 meters (8 feet) of linear feeding space per 100 birds.
Keep feeders shallow at this stage, no more than 7.5 centimeters (3 inches) deep, and place them on the floor. As birds grow from 4-10 weeks (broilers) or 6-14 weeks (pullets), double the feeding space. The feeder depth should increase to about 1.5 centimeters (6 inches).
Here’s what this means in practice: 100 chicks need one 1.25-meter (4-foot) feeder up to 4-6 weeks old. Then you need three of those feeders up to 10 or 14 weeks. For layers beyond 14 weeks, stick with three feeders per 100 birds.
Build feeders with lips to stop feed from spilling out. Add rollers at the open ends so chicks can’t jump in and contaminate the feed with droppings. Metal or wood both work fine.
Most waterers are conical. Two 4-liter waterers handle up to 100 birds from day-old to six weeks. As they grow to 20 weeks, switch to two 10-15 liter waterers. During laying, provide three waterers of that size for every 100 birds.
Don’t use waterers that are too large. They get heavy and tend to waste water. Metal, glass, or plastic all work. Choose based on what’s available and affordable in your area.
In general, equipment comes in two standard sizes: one for chicks and one for older chickens. Use the chick-size feeders and drinkers during brooding. Switch to bigger sizes when birds outgrow them, usually between 4-8 weeks depending on whether they’re broilers or pullets.
You can make your own feeders and waterers if you’re handy. Just make sure they minimize waste and prevent birds from jumping in. Waterers shouldn’t leak and should be easy to wash. Simple designs often work better than complicated ones.
d. Litter Materials
Cover the floor of your brooder house with dry, clean, coarse material before the chicks arrive. This litter absorbs moisture from spilled water and droppings, keeping the house dry all the time.
Wood shavings are the most popular choice. You can usually get them free from sawmills and carpenter shops. Other good options include chopped maize cobs, guinea-corn husks, millet husks, chopped rice straw, chopped fry grass, crushed groundnut shells, and rice husks.
Whatever you use, it needs to absorb well and stay loose so droppings don’t compact into a wet mess.
e. Miscellaneous Equipment
Beyond the basics, you’ll need buckets, brooms, shovels, a wheelbarrow, feed scoops, chicken crates, and ropes for hanging feeders. Water tanks for storage are essential, especially if your water supply isn’t reliable.
For layers, add egg laying nests and egg trays. A weighing scale helps you monitor bird growth and catch health problems early. Bigger operations need office space and equipment too.
Buy additional equipment based on what’s available locally and what your specific operation needs. Don’t buy fancy gadgets that sit unused. Start simple and add things as you identify actual needs.
Summary on Poultry Housing and Equipment
| Topic | Key Points |
|---|---|
| Housing Location | Place young chick houses 50m (150ft) away from older bird houses to prevent disease transfer |
| Foundation | Dig 0.5-0.7m deep, pour a 10cm concrete layer, use anti-termite treatment |
| Walls | Half-open for broilers/growers; 1/3 to 1/2 solid for layers; maximum height 1.9m; plaster inner walls |
| Roofing | Use zinc, aluminum, or asbestos; avoid thatch; provide 0.9m overhang |
| Doors | Minimum 0.9m wide with disinfectant footbath at each entrance |
| Storage | Reserve 1/10 of total house size for equipment and feed storage |
| Brooder Boxes | Provide 7 sq cm per chick; include ventilation holes at top |
| Heat Sources | Kerosene lamps most economical; 2-3 lamps or two 100W bulbs per 75-100 chicks |
| Feeders | 2.5m per 100 chicks initially; double space after 4-6 weeks; use lips and rollers |
| Waterers | Two 4-liter units per 100 chicks; increase to 10-15 liters as birds grow |
| Litter | Wood shavings preferred; alternatives include maize cobs, rice husks, straw |
Frequently Asked Questions About Poultry Housing and Equipment
1. Why should young chick houses be separated from older bird houses?
Young chicks have weaker immune systems and are more vulnerable to diseases. Keeping them at least 50 meters away from older birds reduces the risk of disease transmission. Older birds can carry diseases without showing symptoms, but these same diseases can quickly kill young chicks.
2. Can I use regular cement blocks for poultry house walls?
Yes, standard cement blocks work fine. The important part is having a solid concrete foundation, plastering the inner walls, and using the right ratio of solid to open walls based on your bird type. For broilers and growers, go half-open-sided. For layers, keep solid walls between one-third to one-half height.
3. What’s the best litter material if wood shavings aren’t available?
Several alternatives work well including chopped maize cobs, rice husks, groundnut shells, or chopped straw. The key is that it should be dry, absorbent, and coarse. Avoid materials that pack down when wet or decompose too quickly. Rice husks work particularly well and are often free or cheap.
4. How do I know when to switch from chick-size to adult-size equipment?
Watch your birds, not just the calendar. Generally, birds outgrow chick equipment between 4 and 8 weeks of age. Broilers grow faster and need the switch around 4 weeks. Pullets can use chick equipment longer, usually until 6-8 weeks. If feeders or waterers look crowded or birds are struggling to access them, it’s time to upgrade.
5. Is it worth investing in asbestos roofing over zinc or aluminum?
Asbestos absorbs less heat, which keeps your poultry house cooler. In hot climates, this can improve bird comfort and production. However, asbestos costs significantly more. For most small to medium operations, zinc or aluminum with proper ventilation and a roof overhang works fine. Save asbestos for when your operation is profitable and you’re ready to upgrade.
6. How many kerosene lamps do I need for 200 chicks?
Use 4-6 kerosene lamps for 200 chicks, or about 2-3 lamps per 100 birds. You can also use electric bulbs: four 100-watt bulbs would work. The exact number depends on your climate, house insulation, and time of year. Monitor chick behavior – if they huddle tightly under heat sources, add more lamps. If they spread out far from the heat, you might have too many.
7. Can I build my own feeders and waterers?
Yes, and many successful poultry farmers do exactly that. Use wood or metal to make feeders, ensuring they have lips to prevent spillage and rollers to keep birds from jumping in. For waterers, any container that doesn’t leak and is easy to clean can work. Just make sure the design minimizes waste and contamination. Sometimes simple homemade equipment works better than expensive commercial versions.
8. Why is plastering inner walls important?
Plastered walls are easier to clean and disinfect. Parasites, mites, and disease organisms hide in cracks and crevices of unplastered walls. When you need to clean between batches of birds, smooth plastered walls let you do a thorough job. This helps break disease cycles and keeps your flock healthier.
9. What size should my footbath be at each door?
Make it large enough that people can’t step over it, forcing them to walk through. A good size is about 90cm (3 feet) wide and 60cm (2 feet) deep, though it only needs a few inches of disinfectant solution. Change the disinfectant regularly, especially after heavy use or when it looks dirty. A dirty footbath does more harm than good.
10. How often should I replace litter material?
It depends on how well you manage it. With good management, litter can last an entire growing cycle for broilers (8-10 weeks) or even longer for layers. Remove wet spots and droppings buildup regularly. Add fresh litter on top as needed. Replace all litter between batches of birds. If litter becomes compacted, wet, or smells strongly of ammonia, replace it immediately regardless of timing.
Do you have any questions, suggestions, or contributions? If so, please feel free to use the comment box below to share your thoughts. We also encourage you to kindly share this information with others who might benefit from it. Since we can’t reach everyone at once, we truly appreciate your help in spreading the word. Thank you very much for your support and for sharing!
Read Also: Anatomy of Fishes: Female Fish and their Reproductive Strategies