
Kale, a nutrient-rich leafy vegetable, is a staple in many African diets, with variants like Sukuma wiki in Kenya. This guide provides detailed steps for cultivating kale using sustainable techniques, ensuring a bountiful harvest.
From soil preparation to harvesting, each step is designed for success. Follow these instructions to grow healthy kale in your garden. Whether you’re a beginner or seasoned gardener, this article offers practical insights. Let’s dive into the essentials of kale cultivation.
Understanding Kale and Its Benefits
This section explores kale’s characteristics, nutritional value, and optimal growing conditions. Understanding these aspects helps gardeners make informed decisions for successful cultivation.
A. Kale’s Characteristics
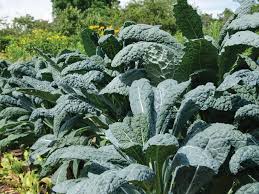
Kale, part of the Brassica oleracea family, is similar to cabbage but easier to grow. Unlike cabbage, it produces leaves that can be harvested over long periods. Its variants, like Sukuma wiki, are popular across Africa. Kale grows taller as it matures, making it ideal for continuous harvesting.
B. Nutritional Value
Kale leaves are packed with nutrients, including high levels of Vitamin C, Vitamin K, and antioxidants. These make it a valuable addition to diets, supporting overall health. Its similarity to spinach lies in its ability to produce edible leaves consistently over time.
C. Optimal Growing Conditions
Kale thrives in temperatures between 7-24°C, making spring and autumn ideal planting seasons. High temperatures can stress seedlings, so timing is crucial. Proper conditions ensure healthy growth and a robust yield for your garden.
Read Also: BellFlowers – All You Need to Know About
Preparing the Soil for Planting
Soil preparation is critical for kale’s growth. This section covers layout, soil fracturing, and nutrient management to create an ideal environment for kale.
A. Triple Row Layout
1. Spacing Strategy: Use a 37.5cm triple-row layout for optimal space use. Final plant spacing is 30cm between plants in triple 37.5cm rows. Split the 75cm row in half, planting at 0, 37.5, and 75cm.
This layout allows easy access for harvesting. For small home gardens, maintain 37.5cm spacing throughout to maximize space efficiency. Permanent pegs mark rows for consistent planting.
B. Setting Up the Planting Line
1. Placing String: Use a taut string or rope between 75cm permanent pegs to ensure straight rows. Lift and drop the rope to confirm it’s tight and aligned properly.
This step ensures accurate row placement. A straight planting line simplifies soil preparation and planting, leading to uniform growth and easier maintenance.
C. Soil Fracturing Technique
1. Fracturing Soil: Push a fork 30cm deep and pull it back slightly to loosen soil every 10cm along the row. Remove stones but avoid lifting or turning the soil.
Fracturing preserves soil structure while improving aeration. This technique supports root growth without disrupting the natural soil ecosystem, crucial for kale’s development.
D. Digging Furrows
1. Furrow Creation: Dig a 10cm deep furrow, moving soil downslope from the planting string. Heap soil neatly for later reuse. Repeat every 37.5cm for triple rows.
Furrows ensure proper planting depth and canopy closure. Access walkways after every triple row make harvesting manageable, maintaining garden organization.
Enhancing Soil Fertility
Fertility management ensures kale receives adequate nutrients. This section details correcting soil acidity and applying manure or compost effectively.
A. Correcting Acidic Soils
1. Applying Amendments: Sprinkle 1 tablespoon of wood ash or bonemeal, or 1 teaspoon of lime, every 60cm along the planting line to neutralize acidic soils.
This correction makes nutrients more available to plants. Proper soil pH supports kale’s growth, ensuring strong roots and healthy leaves over time.
B. Adding Manure or Compost
1. Manure Application: Spread 500ml of manure or compost every 60cm into the furrow. Kale, a medium feeder, benefits from this for its 6-month growth cycle.
Adequate nutrition from the start promotes sustained growth. This step ensures kale plants remain productive throughout their lifecycle in the garden.
C. Soil Separation Layer
1. Covering Inputs: Skim soil from the downslope heap to cover inputs with at least 3cm of soil, achieving a 2cm planting depth to prevent seed burn.
This separation layer protects seeds from manure contact, ensuring good germination. High-quality compost doesn’t require this precaution, simplifying the process.
Read Also: 7 Amazing Health Benefits of Cherries
Planting Kale
This section covers planting seeds or seedlings, including spacing, depth, and post-planting care for optimal germination and growth.
A. Planting Seeds
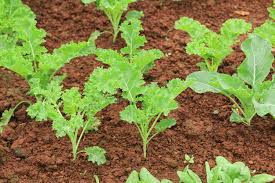
1. Seed Placement: Plant kale seeds 15cm apart, 2cm deep, and cover with fine, loose soil for even germination. Thin to 30cm intervals after sprouting.
Proper seed depth and spacing promote healthy growth. Thinning ensures plants have enough space to develop fully without competition.
B. Planting Seedlings
1. Seedling Installation: Cover furrow inputs with soil until level. Use a dibble stick to create 2.5cm deep holes every 30cm, twisting through the blanket.
Seedlings establish faster than seeds, improving yields. The diamond arrangement optimizes space, ensuring efficient use of the garden area.
C. Ensuring Proper Root Placement
1. Root Care: Ensure seedling roots don’t bend into a J-shape. Press soil gently around roots using a dibble stick or fingers to eliminate airspaces.
Proper root placement prevents growth issues. This step ensures strong establishment, allowing kale to thrive throughout its growth cycle.
D. Post-Planting Care
1. Blanket Application: Leave the blanket off until germination, then place it 2.5cm thick around plant stems to suppress weeds and conserve moisture.
This blanket maintains soil health and reduces maintenance. It supports kale’s long-term growth by minimizing weed competition and retaining water.
Harvesting Kale
Harvesting techniques maximize yield and plant health. This section explains how to harvest kale leaves for continuous production.
A. Harvesting Technique
1. Leaf Selection: Break off the two lowest leaves, allowing inner leaves to fill out. Remove older or diseased leaves to promote new growth.
Selective harvesting extends the plant’s productive life. This method ensures continuous leaf production, supporting multiple harvests over time.
B. Frequency and Yield
1. Harvest Frequency: Kale can yield 6-8 harvests in a 6-month rotation, as seen in model gardens. Regular harvesting encourages new leaf growth.
Consistent harvesting maintains plant vigor. This approach maximizes kale’s productivity, providing a steady supply of nutritious leaves.
C. Plant Health Maintenance
1. Leaf Management: Regularly remove diseased or yellowing leaves to maintain plant health and encourage fresh growth throughout the season.
Monitoring plant health prevents disease spread. This practice ensures kale remains productive and healthy, supporting long-term garden success.
Frequently Asked Questions
1. What is the best time to plant kale?
Kale thrives in 7-24°C, making spring and autumn ideal. Avoid planting in high temperatures, as seedlings are sensitive to heat stress.
2. How often should I water kale?
Water kale regularly to keep soil moist but not waterlogged. The 2.5cm blanket helps conserve moisture, reducing watering frequency.
3. Can I grow kale in a small garden?
Yes, use 37.5cm spacing throughout for small gardens. This layout maximizes space while allowing easy access for harvesting.
4. Why is soil fracturing important?
Fracturing loosens soil without disturbing its structure, improving aeration and root growth. It supports kale’s development without turning the soil.
5. How do I prevent seed burn?
Cover manure with a 3cm soil layer before planting seeds at 2cm depth. This separation prevents poor germination caused by seed burn.
6. Should I use seeds or seedlings?
Seedlings establish faster, improving yields. However, seeds are viable with proper spacing and thinning to 30cm after germination.
7. How do I maintain soil fertility for kale?
Apply 500ml of manure or compost every 60cm and correct acidic soils with wood ash, bonemeal, or lime for optimal nutrient availability.
8. How long can I harvest kale?
Kale can be harvested 6-8 times over 6 months. Break off lower leaves regularly to encourage continuous new leaf growth.
Do you have any questions, suggestions, or contributions? If so, please feel free to use the comment box below to share your thoughts. We also encourage you to kindly share this information with others who might benefit from it. Since we can’t reach everyone at once, we truly appreciate your help in spreading the word. Thank you very much for your support and for sharing!