
This article provides a comprehensive guide to setting up and managing seedling nurseries for vegetable crops, covering nursery design, bed and tray preparation, watering, transplanting, and the use of tools like the dibble stick.
Seedling Nursery Setup
This section outlines the essentials of designing and managing seedling nurseries, emphasizing their advantages and key considerations for successful establishment.
A. Benefits of Seedling Nurseries
Seedling nurseries simplify planting by allowing farmers to focus on a small area rather than an entire field. This approach is ideal for sensitive vegetables, reducing the challenges of managing tiny, emerging plants. Only the strongest seedlings, typically 7-10 cm tall, are transplanted, ensuring uniform stands.
B. Site Selection and Design
Choose a secure nursery site near a water source with good drainage. Raised beds or seedling trays are effective options. Shade is critical during early growth, using materials like shade netting or palm leaves. Ensure the shade structure, about 2 meters high, allows easy access for management.
C. Shade and Sunlight Management
Shade protects young seedlings from intense sunlight. Use a canopy wider than the beds to provide coverage throughout the day. Consider the sun’s movement when designing the structure. Materials like bamboo or thatch grass work well to maintain adequate shade for healthy seedling development.
Read Also: BellFlowers – All You Need to Know About
Preparing Nursery Beds and Trays
This section details the preparation of nursery beds and trays, including soil mix, planting techniques, and hygiene practices to ensure healthy seedling growth.
A. Constructing Raised Nursery Beds
1. Bed Dimensions: Create raised beds 100 cm wide, 15 cm high, and as long as needed based on seedling numbers (refer to chapter 2.4).
2. Soil Mixture: Add 5 cm of seedling mixture on top of the fractured bed, wet thoroughly, and press firmly with a wooden plank.
3. Planting Furrows: Use the plank’s narrow edge to make 1 cm deep furrows every 10 cm. Space seeds 5 cm apart in rows for safe root extraction.
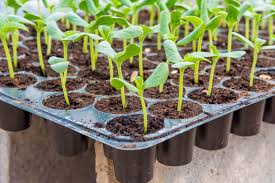
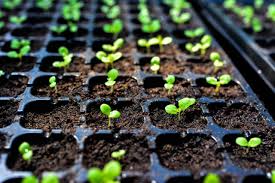
B. Using Seedling Trays
1. Tray Preparation: Soak trays in a 1:10 bleach-to-water solution to eliminate pests and diseases. Fill with seedling mix and press to 1 cm deep.
2. Planting Seeds: Place one seed per plug, cover with moist seedling mix, and scrape off excess without firming to allow easy germination.
3. Labeling: Use ice-cream sticks or plastic strips to note crop, variety, and sowing date for easy identification.
C. Advantages of Seedling Trays
Seedling trays minimize labor and water waste while promoting strong root systems and structural integrity. Alternatives like egg trays or homemade paper rolls can also be used. Trays ensure consistent seedling quality, making them ideal for efficient nursery management.
Watering and Maintenance
This section explains proper watering techniques and maintenance practices to support seedling health and prevent issues like overwatering.
A. Watering Guidelines
1. Frequency: Water lightly once daily using a watering can with a fine nozzle. In hot conditions, water twice daily if needed.
2. Moisture Monitoring: Regularly check the soil mix to assess moisture levels. The high compost ratio retains moisture, reducing stress on seedlings.
3. Avoiding Overwatering: Excessive watering can cause bacterial wilt. Adjust watering based on plant and soil observations to maintain optimal moisture.
B. Shade Protection
Shade prevents moisture stress in seedlings. The shade structure, combined with the compost-rich soil mix, ensures consistent moisture retention. Adjust shade as seedlings grow to balance light exposure and moisture needs for healthy development.
C. Maintenance Practices
Regularly inspect seedlings for signs of stress or disease. Ensure the nursery remains pest-free by maintaining hygiene, especially when using recycled trays. Proper maintenance enhances seedling vigor and prepares them for successful transplanting.
Read Also: Complete List of Popular Common Foods and their Fiber Contents
Transplanting Seedlings
This section covers the process of hardening off and transplanting seedlings, including tools and techniques to ensure successful field establishment.
A. Hardening Off Seedlings
1. Gradual Sun Exposure: Start 10 days before transplanting by gradually removing shade materials like palm leaves to increase sunlight exposure.
2. Water Reduction: Halve watering on alternate days, then skip a full day every second day to toughen seedlings.
3. Pre-Transplant Watering: Ensure seedlings are well-watered and turgid several hours before transplanting to support their transition.
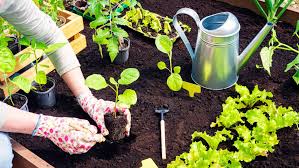
B. Removing Seedlings
Use a sharp handheld spade to extract seedlings from beds, keeping sufficient root and soil mix intact. Store seedlings in the shade until planting. Transplant as soon as possible into well-prepared vegetable beds for optimal growth.
C. Using a Dibble Stick
1. Tool Description: A dibble stick, often T-shaped or straight, is used to create planting holes. It should be slightly wider than the seedling plug.
2. Planting Technique: Twist the stick to make a hole, ensuring no airspaces remain under the roots. Press soil gently against roots at a 45° angle.
3. Finishing Touches: Cover the small hole near the seedling by hand or foot, or let it fill naturally to secure the plant.
Frequently Asked Questions
1. Why use seedling nurseries instead of direct sowing?
Seedling nurseries allow focused care on a small area, ensuring stronger plants and uniform growth, reducing issues like gapping in fields.
2. What materials are best for shade in nurseries?
Shade netting, palm leaves, thatch grass, or bamboo are effective, providing protection while allowing air circulation and easy access.
3. How often should seedlings be watered?
Water lightly once daily with a fine nozzle. In hot conditions, water twice daily, but avoid overwatering to prevent bacterial wilt.
4. Can I reuse seedling trays?
Yes, but soak them in a 1:10 bleach-to-water solution to eliminate pests and diseases before refilling with seedling mix.
5. How do I harden off seedlings before transplanting?
Gradually increase sunlight exposure over 10 days by removing shade and reduce watering, skipping a full day every second day.
6. What is a dibble stick, and why is it important?
A dibble stick is a pointed tool for making planting holes. It ensures proper root placement, minimizing airspaces for healthy seedling growth.
7. How do I know when seedlings are ready to transplant?
Seedlings are ready when they reach 7-10 cm in height, have strong roots, and have been hardened off to tolerate field conditions.
8. Can I use homemade alternatives to seedling trays?
Yes, old egg trays or homemade paper rolls are effective alternatives, provided they are sanitized and filled with proper seedling mix.
Do you have any questions, suggestions, or contributions? If so, please feel free to use the comment box below to share your thoughts. We also encourage you to kindly share this information with others who might benefit from it. Since we can’t reach everyone at once, we truly appreciate your help in spreading the word. Thank you very much for your support and for sharing!