
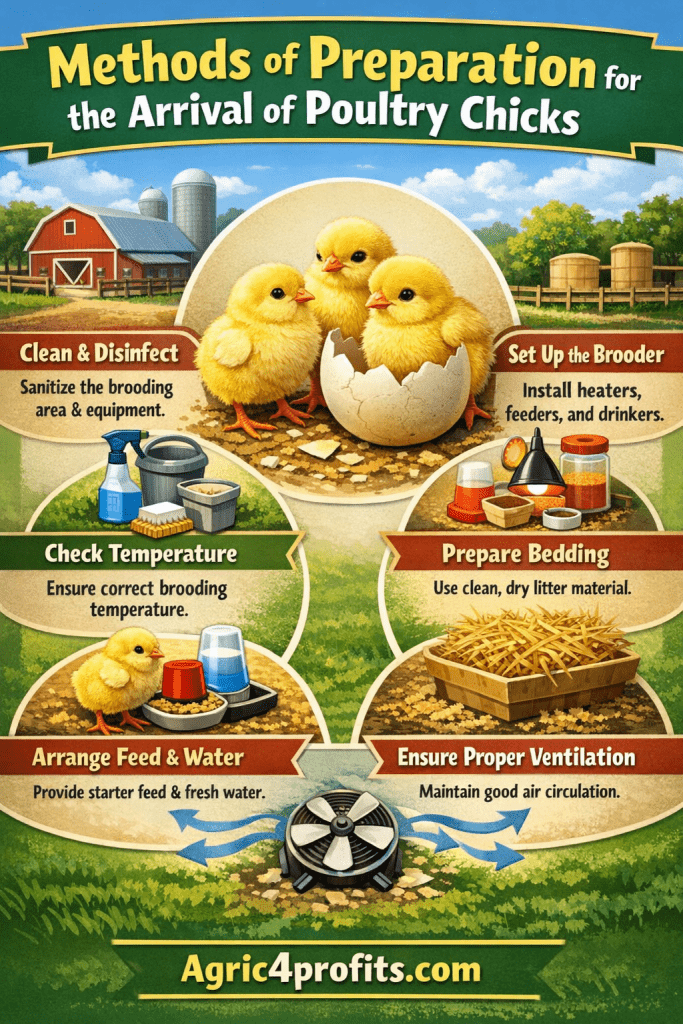
Getting ready for new chicks takes planning. You need to start weeks before they arrive at your farm. The survival rate of your chicks depends heavily on how well you prepare. Many farmers lose chicks in the first few weeks because they rush the preparation process or skip important steps.
Think of it this way: chicks are delicate creatures when they first hatch. They can’t control their body temperature. They need warmth, clean water, and proper food right away. If any of these things are missing or done wrong, you’ll see problems fast.
Good preparation means checking every detail. Your brooder house needs to be clean and secure. Your equipment should work properly. You need the right supplies on hand. And you need to know where you’re getting your chicks from.
This guide walks you through each step. We’ll cover buying chicks, preparing the brooder house, and what to do in the final days before arrival. Follow these steps and you’ll give your chicks the best possible start. That means healthier birds and better production down the line.
1. Buying Chicks

A. Choosing a Reliable Hatchery
Buy your day-old chicks from a hatchery you can trust. Quality matters here. Healthy chicks with good genetics will grow into productive birds. Poor-quality chicks cause problems from day one.
Order your chicks about six months ahead. Yes, six months. Good hatcheries book up fast, especially during peak seasons. When you place your order, tell them exactly what you need. Specify the sex, the strain, and how many chicks you want.
Not sure which breed to choose? Talk to your local poultry extension officer. They know which breeds work best in your area. They can also recommend hatcheries with good track records.
B. Buying Starter Pullets Instead
Some farmers prefer to skip the brooding stage entirely. They buy starter pullets instead of day-old chicks. Starter pullets are young birds that someone else has already raised past the critical early weeks.
Point of lay chickens aren’t widely available commercially yet. But raising starter pullets can be a profitable business if you work with egg producers. There’s definitely demand for it.
If you decide to buy starter pullets, do your homework first. Check the producer’s records. Look at vaccination schedules, feed programs, and mortality rates. Then physically examine the birds. Weigh a sample to make sure they’ve hit the recommended weight for their age and breed. Don’t buy underweight or sickly-looking birds just because the price seems good.
C. Transportation Preparation
Get everything ready before you pick up your chicks. Proper transport keeps them safe during the trip. Good reception at the farm sets them up for success during brooding. These steps directly affect how many chicks survive their first few weeks.
Read Also: Production Practices for Poultry Operations
2. Brooder House Preparation
A. Three Weeks Before Arrival
Start preparing your brooder house three weeks ahead. This gives you enough time to do everything properly without rushing.
i. Repairs: Fix any leaking roofs right away. Water damage creates mold and cold spots. Repair broken doors so they close properly. This keeps predators out and heat in. Plaster any cracks in the walls. Even small cracks let in drafts that can chill your chicks.
ii. Deep Cleaning: If the house was used before, remove all old litter completely. Sweep out every corner. Then wash everything thoroughly with water. After washing, disinfect the entire house using Izal, Dettol, Sanitisers, or Milton. Mix the disinfectant according to the instructions on the bottle. Let the house dry completely before moving to the next step.
iii. Equipment Cleaning: Wash all feeding troughs and drinkers thoroughly. Old feed residue or dirty water can make chicks sick. After washing, disinfect these items just like you did the house. Make sure they’re completely dry before you use them.
iv. Equipment Check: Go through your equipment list. Make sure you have everything you need. Check that heat sources work properly. Test thermometers to ensure they’re accurate. Replace any broken or worn-out items now, not when the chicks arrive.
3. Two Days Before Arrival of Chicks

A. Final Preparations
The last two days are crucial. This is when you set up everything the chicks will need immediately.
i. Final Sweep: Sweep the house one more time. Clean all equipment again. You want everything spotless when those chicks arrive.
ii. Laying the Litter: If your floor isn’t cemented, put down a layer of dry, clean sand first. This creates a moisture barrier. Then add your litter material on top. Wood shavings work well. Spread it to a depth of about 7.5cm or three inches. The litter should be dry and free from mold or dust.
iii. Paper Protection: Cover the litter with rough brown paper or old newspapers. This stops chicks from eating the litter while they’re learning what food is. Chicks are curious and will peck at anything. The paper keeps them focused on the feed. Remove this paper after four days once they understand where the food is.
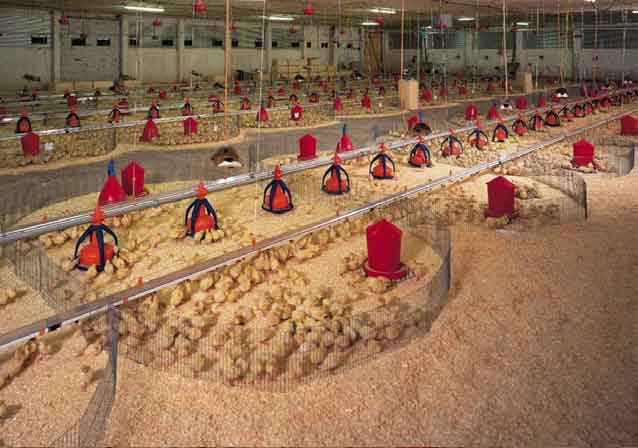
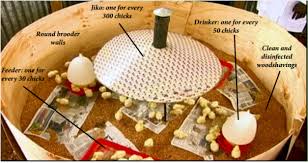
iv. Equipment Setup: Place your brooder box in the middle of the house. Arrange the feeders in a circle around the heat source. Space them evenly so all chicks can access them easily. Put the water fountains between the feeders but near the edge of the heated area. Chicks need to find water quickly but it shouldn’t be so close to the heat that it gets warm.
Set up a chick guard around everything. Use cardboard about 45cm or 30 inches high. Place it about 1.5m or 5 feet from the brooder box. This creates a safe zone. The guard keeps the chicks from wandering too far from the heat and getting cold. You can use blocks or other materials if you don’t have cardboard. Move the guard back a little each day. Remove it completely after 10 days when the chicks are stronger and more mobile.
v. Equipment Testing: Test everything before the chicks arrive. Turn on the heat source and check that it reaches the right temperature. Fill the drinkers and make sure they don’t leak. Put feed in the troughs to see if they’re stable. Fix any problems now.
vi. Side Protection: If you’re using a half-open-sided house, cover the open sides. Use plastic sheets, thick cardboard, native mats, or empty feed bags. Anything that blocks wind and keeps heat in will work. You need the house to maintain a steady temperature.
Read Also: Facilities Required for Brooding and Rearing of Poultry Chickens
Summary on Methods of Preparation for the Arrival of Poultry Chicks
| Preparation Stage | Timing | Key Actions |
|---|---|---|
| Ordering Chicks | 6 months in advance | Choose a reliable hatchery, specify sex/strain/quantity, consult the extension officer |
| Alternative Option | As needed | Buy starter pullets, verify producer records, check bird weights and health |
| Brooder House Prep | 3 weeks before arrival | Make repairs, remove old litter, deep clean and disinfect, clean equipment, check all gear |
| Final Setup | 2 days before arrival | Final sweep, lay litter (7.5cm deep), cover with paper, arrange equipment, install chick guard |
| Equipment Testing | 2 days before arrival | Test heat source, check drinkers for leaks, verify feeder stability, cover open sides |
| Protection Measures | Before arrival | Set up 45cm high chick guard 1.5m from heat, cover open house sides, ensure draft-free environment |
Frequently Asked Questions About Preparing for Poultry Chick Arrival
1. How far in advance should I order my chicks?
Order about six months ahead. Good hatcheries get booked up quickly, especially during busy seasons. This gives you time to plan everything else too.
2. What’s better for beginners: day-old chicks or starter pullets?
Starter pullets are easier for beginners. Someone else handles the tricky brooding stage. But they cost more upfront. Day-old chicks are cheaper but need more care and expertise in those critical first weeks.
3. Why do I need to start preparing the brooder house three weeks early?
Three weeks gives you time to make repairs, clean thoroughly, and let disinfectants work properly. You also have time to fix any problems you discover. Rushing leads to mistakes that can kill chicks.
4. Can I use any type of litter material?
Wood shavings work best. Rice hulls are okay too. Don’t use sawdust because it’s too fine and chicks can inhale it. Whatever you use needs to be dry, clean, and free from mold.
5. Why cover the litter with newspaper?
Chicks peck at everything when they first arrive. The newspaper stops them from eating litter instead of feed. Remove it after four days once they’ve learned where the food is.
6. How high should the temperature be in the brooder?
Start at about 35°C or 95°F for the first week. Watch the chicks though. If they huddle together under the heat, they’re cold. If they move far away from it, they’re too hot. Adjust based on their behavior.
7. What’s the purpose of the chick guard?
It keeps chicks from wandering too far from the heat source and getting cold. Young chicks can’t regulate their body temperature well. The guard creates a safe zone where they stay warm.
8. When can I remove the chick guard?
Move it back gradually each day. Remove it completely after about 10 days. By then the chicks are stronger and better at finding their way around.
9. What should I look for when buying starter pullets?
Check the producer’s records first. Look at vaccination history, feed programs, and mortality rates. Then examine the birds physically. They should be active and alert. Weigh several birds to confirm they’ve reached the proper weight for their age.
10. Do I really need to disinfect if the house looks clean?
Yes. Bacteria and viruses aren’t visible. Even a clean-looking house can harbor diseases from previous flocks. Proper washing and disinfection protect your new chicks from getting sick.
Do you have any questions, suggestions, or contributions? If so, please feel free to use the comment box below to share your thoughts. We also encourage you to kindly share this information with others who might benefit from it. Since we can’t reach everyone at once, we truly appreciate your help in spreading the word. Thank you very much for your support and for sharing!
Read Also: Anatomy of Fishes: Female Fish and their Reproductive Strategies