
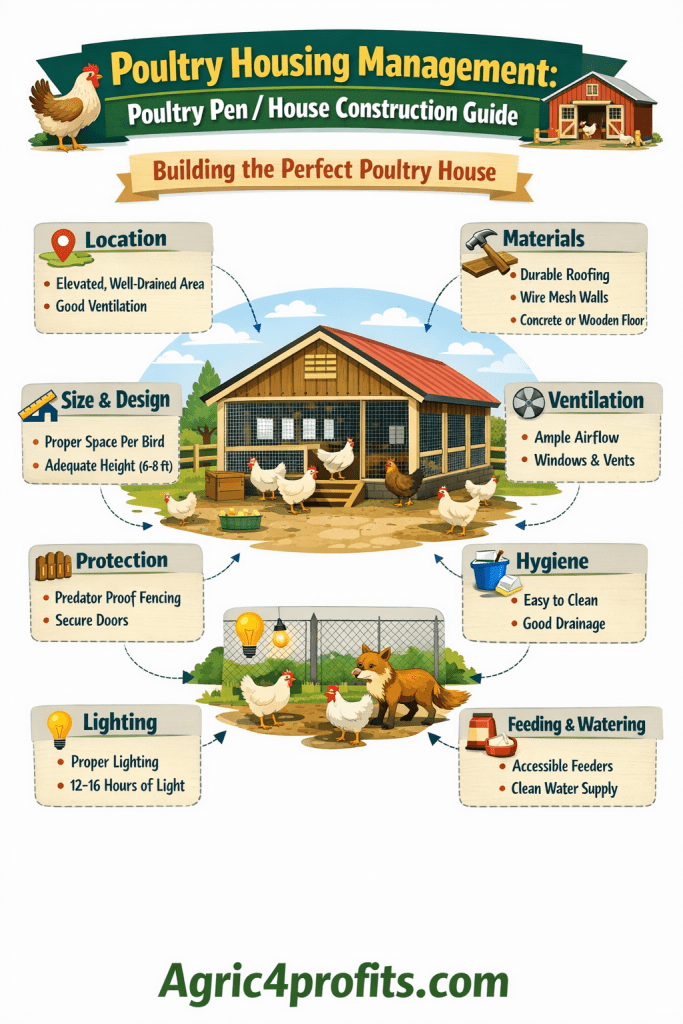
Starting a poultry farm is one thing. Building the right house for your birds is another. Many farmers lose money because they get the housing part wrong. Your birds need a safe place that protects them from weather, predators, and disease. But it also needs to be practical for you to manage.
Good poultry housing is not just about throwing up four walls and a roof. You need to think about ventilation, space, drainage, and how easy it will be to clean. The wrong setup can stress your birds, reduce egg production, or even kill them. On the other hand, a well-designed poultry house keeps your flock healthy, productive, and profitable.
Whether you are raising 50 birds in your backyard or planning a commercial operation with thousands, the basic principles remain the same. You want to create an environment where birds can thrive. This means controlling temperature, providing fresh air, keeping out pests, and making daily management easier.
In this guide, we will walk through everything you need to know about poultry housing. From picking the right location to choosing between different housing systems, you will learn what works and what does not. We will cover construction details, material choices, and common mistakes to avoid. By the end, you will have a clear roadmap for building or improving your poultry house.
1. Understanding Poultry Housing Systems
You have options when it comes to housing your birds. The system you choose depends on your budget, space, and production goals.
A. Free Range System
This is the most basic approach. Birds roam freely in a fenced area and forage for food. You provide simple shelters for roosting and protection from rain. This system works well for small operations or organic production.
The birds get exercise and natural feed from insects and plants. But you need a lot of land, and production rates are lower compared to intensive systems. Disease control is harder because birds are exposed to wild animals and their droppings.
You can rear about 250 adult birds per hectare. The fields are usually rotated after crop harvests. All types of birds can be raised this way, and it is the preferred method for organic egg production.
B. Semi-Intensive System
This is a middle ground. Birds have access to both indoor housing and outdoor runs. They spend nights and part of the day inside, then go out to forage. The outdoor area is fenced and controlled.
This system gives birds some natural behavior while keeping better control over feeding and health. It is popular for backyard flocks and small commercial operations.
C. Intensive System
Birds are confined to houses full-time. This system comes in two main types.
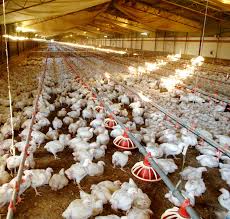
i. Deep Litter System
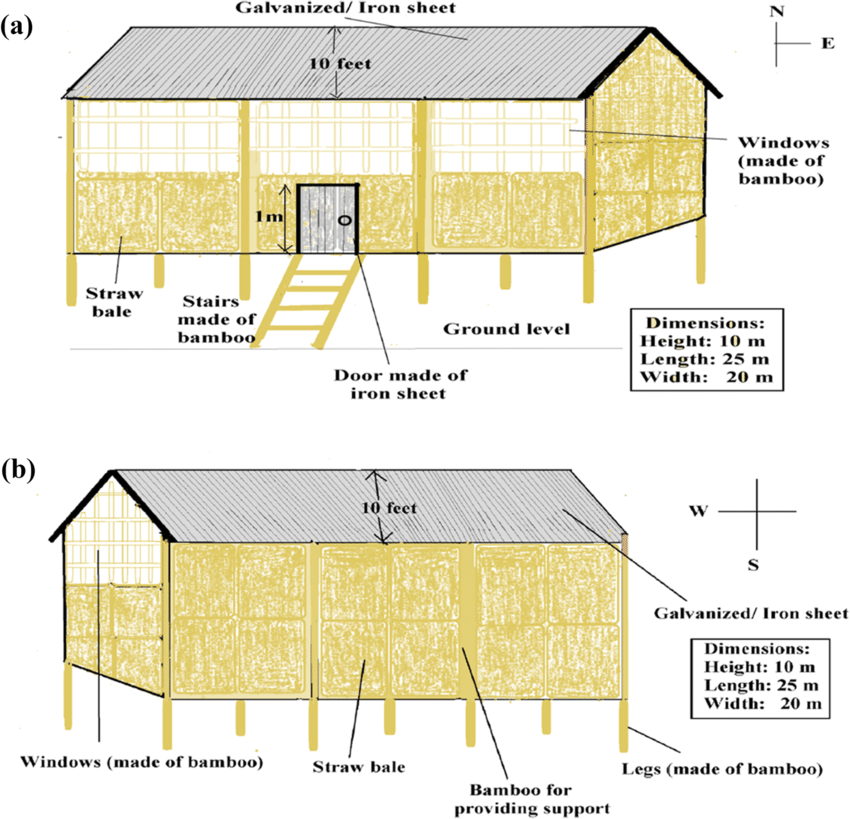
Birds live on a floor covered with litter material like wood shavings, rice hulls, or sawdust. The litter absorbs droppings and provides insulation. You add fresh litter regularly, building it up to 3-5 inches deep.
The house should not exceed 10 meters in width for proper ventilation. Ammonia from droppings can kill birds if ventilation is poor. A concrete wall about 1 meter high is recommended, with wire mesh or open space above for air flow.
Benefits include vitamin B12 production in the litter, better bird welfare, and valuable manure for fertilizer. Problems include bacterial diseases, parasites, and respiratory issues from dust.
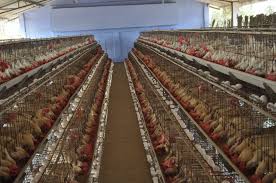
ii. Cage System
Birds are kept in wire cages stacked in tiers. Each cage holds 1-3 birds. Eggs roll into collection gutters. Feed and water are provided outside the cages. Droppings fall through to a pit or tray below.
Buildings must be well-ventilated and allow for easy washing. In tropical areas, use open-ended buildings with 1-meter concrete walls and chicken mesh. A sloping trench catches droppings for easy removal.
Cages save space and increase bird density. You can manage more birds with less labor. Feed consumption is lower because birds do not waste energy moving around. Disease control is easier because you can isolate sick birds quickly.
Downsides include high initial costs, bird welfare concerns, and the strong smell from concentrated droppings. Urban areas may not allow this system due to odor complaints.
2. Site Selection for Poultry Houses
Where you build matters as much as how you build.
A. Distance from Residences
Location of nearby homes should be your first consideration. Good neighbors can become enemies if your poultry house is too close. Odors, dust, noise, and flies will cause problems.
Some poultry companies require you to discuss plans with neighbors before construction. Even if not required, this is smart. Negative reactions may force you to choose a different site.
B. Setback Requirements
How far should you build from property lines, roads, streams, and wells? Some states have no regulations, but poultry companies often have their own guidelines. These help reduce problems with odor, dust, feathers, noise, and water quality.
C. Topography and Drainage
Choose level or gently rolling ground. Steep hills mean more grading work and higher construction costs. Avoid low areas near streams that flood.
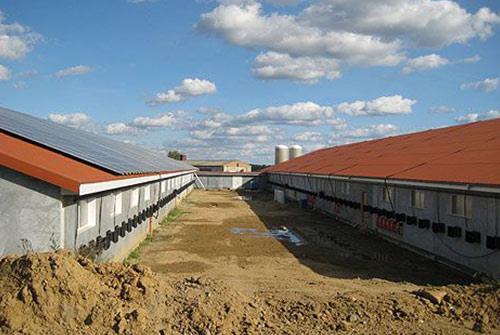
The long axis of the house should run east to west. This minimizes direct sunlight entering through side walls, keeping the house cooler.
Storm water drainage is critical because of large roof areas. Prevent erosion with grass-covered ditches. The ground around buildings needs enough slope to keep water out.
D. Prevailing Winds
Consider wind direction, especially if it blows from your chicken house toward any residence. This carries odors directly to neighbors.
E. Utilities and Access
The site needs clean water, electricity, and good road access. Difficult access increases operating costs and makes emergency response harder.
F. Distance from Other Poultry Houses
Keep at least 10 meters between houses to reduce disease spread. More distance is better.
G. Shade and Windbreaks
In hot climates, tall trees provide shade without blocking ventilation. Bushy trees that block airflow are not helpful. In windy areas, hills or tree stands offer protection. You may need a solid wall facing the prevailing monsoon direction.
H. Noise and Disturbances
Build away from roads, work areas, and noisy places. Stress from disturbances reduces production.
Read Also: Poultry Housing Management: Site Selection Guide
3. Essential Features of Good Poultry Housing
Every good poultry house shares certain characteristics.
A. Water-Tight Roof
The roof must keep rain out completely. Wet birds get sick. Wet litter breeds disease. Use materials appropriate to your budget: thatch, tiles, asbestos sheets, or concrete.
Roof types include shed, gable, half-monitor, full-monitor, flat concrete, gambrel, and gothic. Gable roofs work best in tropical countries. The overhang should extend at least 3.5 feet to prevent rain from entering the shed.
Shingle roofs need at least a 1/3 pitch for proper runoff. Metal roofs can be nearly flat. In snow areas, reinforce the structure to handle extra weight.
B. Proper Ventilation
Fresh air is vital. Poor ventilation leads to ammonia buildup, respiratory disease, and death. But you also need to avoid cold drafts that chill birds.
Side walls should be 1 to 1.5 feet high, roughly at bird back height. This protects birds from rain and cold while allowing air circulation. For cage houses, no side wall is needed. Above the wall, use wire mesh or open space.
C. Adequate Height
The house should be at least 1.8 to 2.0 meters high so you can stand upright. Center height should be 3.0 to 3.3 meters. This allows good air circulation and comfortable working conditions.
D. Proper Floor Space
Overcrowding causes stress, disease, and reduced production. Space requirements vary by age and type:
i. Chickens 0-6 weeks old: 10-12 birds per square meter (floor size 5m x 2m for 100 birds)
ii. Pullets to 16 weeks old: 5-7 birds per square meter (floor size 2m x 2m for 25 birds)
iii. Laying hens: 5 birds per square meter (floor size 5m x 2m for 25 hens)
iv. Hens in layer cages: 12-15 birds per square meter
v. Cage dimensions: For 3 hens: 40cm long x 30cm wide x 45cm high. For 5 hens: 50cm long x 30cm wide x 45cm high.
E. Rat-Proof Construction
Floors and walls must keep out rats and mice. These pests eat feed, spread disease, and kill chicks.
Concrete floors work best for permanent houses. They are sanitary, easy to clean, and rat-proof. Cover concrete with litter for warmth and dryness when birds have direct floor contact.
Wooden floors work where the ground is uneven, but should be 1.5 to 3 feet above ground. Less space creates rat harbors and causes rot.
F. Easy-to-Clean Surfaces
You will clean this house regularly. Smooth surfaces save time and improve sanitation. Rough spots harbor bacteria and parasites.
G. Access to Clean Water
The poultry house must be near a clean water source. Birds need constant access to fresh water.
Read Also: The Nutritional Requirements and Deficiency Symptoms for Poultry Chickens
4. Construction Details of Poultry Housing
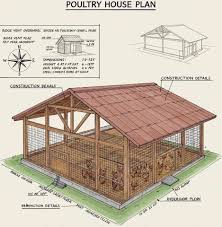
Now for the specifics of building.
A. Foundation
Dig 3 feet deep and 2.5 feet wide at the bottom. Gradually reduce width to 1 foot at surface level. The foundation must be solid enough to support the building and high enough to keep out surface water.
B. Plinth
The plinth should be 0.6 to 0.9 meters high for efficient drainage.
C. Posts and Supports
i. Wooden posts: Use 6 to 8 inch diameter posts, spaced 6 to 8 feet apart. Bury them 2 to 3 feet in the ground or below frost level. Cedar, locust, chestnut, redwood, and cypress last longest.
ii. Concrete posts: More durable than wood but more expensive.
D. Sills, Studs, and Plates
Sills support the building and rest on concrete supports, walls, or wooden posts. Dimensions depend on building size:
i. 2 x 4 inches: For colony-style or single-wall construction
ii. 4 x 4 inches: For larger houses or double-wall construction
iii. 4 x 6 inches: For two-story bird houses
Studs or uprights rest on sills. Plates lay on top of studs. Rafters rest on plates.
E. Walls
Stud height should be 2.10 to 2.40 meters. Side walls from plinth level should be 0.3 to 1.20 meters. Above this, install wire mesh along the sides.
Double-wall construction provides better insulation for cooler climates. The front should be high enough to allow sunlight even in winter.
F. Floors
Concrete is best for stationary houses. Make it 8 to 10 cm thick with a 2 to 3 degree slope per 20 feet for drainage. Provide a rat-proof projection (0.45 to 0.60 meters wide) around the house at floor level.
The floor surface should be rough to prevent birds from slipping.
G. Doors
Doors must open outward in deep-litter houses. Preferably 6 x 2.5 feet. Place a foot bath at the entry filled with disinfectant to prevent disease transmission between houses.
H. Windows and Light
Arrange windows and curtains to let in maximum direct sunlight when opened. Sunlight helps birds convert minerals in their bodies and improves performance.
I. Drainage and Ant Prevention
Some houses have concrete drains filled with insecticide solution to prevent soldier ants. These ants can attack birds, especially chicks.
5. Using Existing Buildings
Many farmers ask if they can use uncompleted buildings or spare rooms for poultry.
The answer is yes, with conditions. The space must provide adequate ventilation. Invite an expert to inspect before moving birds in. This works for small flocks. For large-scale commercial farming, build a proper poultry house.
A typical standard room can house about 50 birds, but this depends on room size and ventilation quality.
Read Also: Layers or Broilers which One is More Profitable in Poultry Farming? Find Out!
6. Brooding Areas for Chicks
Young chicks need special housing.
A. Brooder Setup
Use a container with 12 to 18 inch high sides to prevent chicks from escaping as their wings develop. Find a warm, dry, well-ventilated location.
Keep the brooder separate from adult birds, who may injure growing chicks. Use chicken wire for isolation. Garages, sunrooms, or ventilated outbuildings work well.
Protect against snakes, raccoons, and house pets. Anchor window screens on top if security is an issue.
B. Heat Source
Hang a 250-watt bulb about 18 inches above the brooder floor. As chicks develop, they need less supplemental heat.
C. Brooding Methods
i. Spot brooding: Chicks have a localized heat source and access to cooler areas. They regulate their own temperature by moving between zones.
ii. Whole house brooding: A large area is warmed to the same temperature. Chicks have no choice between warm and cool areas.
iii. Partial house brooding: Similar to whole house, but the brooding area is minimized to save energy.
D. Energy Management
When brooders are no longer needed, shut off half the pilot lights. Turn off every other brooder. The remaining ones prevent problems if internal temperatures drop suddenly.
Read Also: 12 Management Tips for better Poultry Performance Potential
7. Equipment Requirements for Poultry Housing
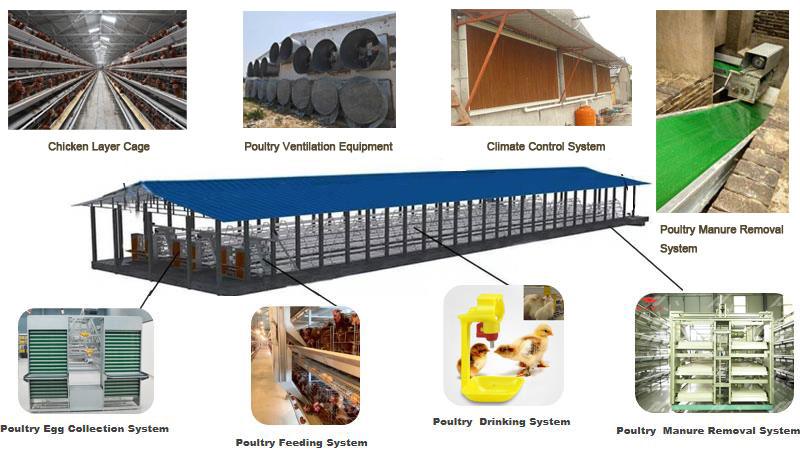
A. Feeders
Do not overfill food troughs. Tube feeders should not be opened too wide. Proper construction reduces spillage by up to 20 percent. Food wastage can turn profit into loss.
B. Drinkers
Both feeders and drinkers should:
i. Be stable and not tip over
ii. Have adequate size and depth
iii. Discourage scratching out of contents
iv. Not cause injury to birds
v. Be cheap and locally constructible
C. Nipple Drinkers
For cage systems, nipple drinkers prevent water spillage and reduce contamination risk. Install them above feeding channels.
D. Other Equipment
i. Beak trimmers: Prevent pecking injuries
ii. Blow lamps: Eliminate parasites from metal surfaces
iii. Catching mesh and crates: For handling birds
iv. Egg filler flats: For storage and transport
v. Candlers: Assess egg quality without breaking them
vi. Refrigerators: Store eggs and vaccines
8. Layout and Orientation Principles for Poultry Housing
Plan your farm layout carefully.
A. Building Orientation
Position the long axis east to west to minimize direct sun exposure through side walls.
B. Multiple House Spacing
Space houses at least 10 meters apart. More is better for disease control.
C. Access Roads
Plan for vehicle access to all houses for feed delivery, bird removal, and manure handling.
D. Waste Management Areas
Designate areas for manure storage and disposal away from houses and water sources.
9. Material Choices and Costs
A. Low-Cost Options
Use locally available materials to reduce costs:
i. Flooring: Clay, stone slabs, wooden planks, or cement mortar instead of concrete
ii. Roofing: Thatch or tiles instead of asbestos or metal sheets
iii. Walls: Bamboo, mud blocks, or wood instead of concrete blocks
These save money but require more maintenance. They are less durable and more prone to pest problems.
B. Standard Materials
i. Concrete: For floors, foundations, and permanent walls
ii. Galvanized iron: For cages and roofing
iii. Wire mesh: For ventilation areas
iv. Treated wood: For posts and framing
C. Cost Considerations
Cheaper materials reduce initial investment but increase long-term costs through repairs and replacements. Balance upfront costs with durability and maintenance needs.
10. Common Mistakes to Avoid
A. Insufficient Ventilation
The number one killer of birds. Do not sacrifice air flow for warmth.
B. Overcrowding
More birds per square meter seems profitable until disease spreads and production drops.
C. Poor Drainage
Water around the house leads to mud, disease, and structural damage.
D. Building Too Close to Neighbors
You cannot move a house once built. Get the location right the first time.
E. Skimping on Rat-Proofing
Rats multiply fast and cause enormous damage. Build proper defenses from the start.
F. Ignoring Prevailing Winds
Wind direction affects odor spread, cooling, and rain entry.
G. Using Unsuitable Litter
Not all materials work well. Avoid dusty or moldy materials that cause respiratory problems.
11. Advantages and Disadvantages of Different Systems
A. Free Range System
Advantages:
i. Low housing costs
ii. Reduced feed requirements
iii. Better soil fertility from manure distribution
iv. Natural behavior and welfare
Disadvantages:
i. Lower production rates
ii. Difficult disease control
iii. Cannot apply scientific management practices
iv. Requires large land area
v. Higher predator losses
B. Deep Litter System
Advantages:
i. Birds can express natural behaviors
ii. Vitamin B12 production in litter
iii. Valuable manure production
iv. Less fly problems than cages
Disadvantages:
i. Risk of bacterial and parasitic diseases
ii. Respiratory problems from dust
iii. More labor for litter management
iv. Requires regular monitoring and maintenance
C. Cage System
Advantages:
i. Maximum space efficiency
ii. Higher production performance
iii. Better disease control
iv. Easy isolation of sick birds
v. Precise scientific management
vi. No litter costs
vii. Reduced labor requirements
Disadvantages:
i. High initial investment
ii. Bird welfare concerns
iii. Strong odor from concentrated droppings
iv. Cannot be located in some urban areas
v. Birds cannot perform natural behaviors
vi. All nutrients must be provided in feed
12. Maintenance and Management
A. Daily Tasks
i. Check ventilation systems
ii. Inspect for leaks or damage
iii. Monitor temperature and humidity
iv. Observe bird behavior for stress signs
B. Weekly Tasks
i. Clean feeders and drinkers thoroughly
ii. Add fresh litter in deep-litter systems
iii. Check for pest activity
iv. Inspect all equipment functionality
C. Monthly Tasks
i. Deep clean of entire house
ii. Disinfect all surfaces
iii. Check structural integrity
iv. Service mechanical equipment
D. Between Batches
i. Complete cleanout and disinfection
ii. Repair any damage
iii. Replace worn equipment
iv. Rest the house before new birds arrive
Summary on Poultry Housing Management and Construction
| Aspect | Key Points |
|---|---|
| Housing Systems | Free range (250 birds/hectare), Semi-intensive (indoor/outdoor access), Intensive (deep litter or cage system) |
| Site Selection | Consider distance from residences (10m minimum), drainage, prevailing winds, access to utilities, avoid flood zones |
| Floor Space Requirements | 0-6 weeks: 10-12 birds/m², Pullets: 5-7 birds/m², Layers: 5 birds/m², Cage layers: 12-15 birds/m² |
| Height Requirements | Minimum 1.8-2.0m wall height, 3.0-3.3m center height for proper ventilation and working space |
| Roof Overhang | Minimum 3.5 feet to prevent rain entry |
| Side Wall Height | 1-1.5 feet (at bird back height) for weather protection and ventilation |
| Door Specifications | 6 x 2.5 feet, opens outward, foot bath with disinfectant at entry |
| Foundation Depth | 3 feet deep, 2.5 feet wide at bottom, tapering to 1 foot at surface |
| Best Roof Type | Gable type for tropical countries, adequate pitch for water runoff |
| Flooring Material | Concrete (8-10cm thick) with 2-3 degree slope for drainage, rough surface to prevent slipping |
| Cage Dimensions | 3 hens: 40cm x 30cm x 45cm, 5 hens: 50cm x 30cm x 45cm |
| Litter Depth | 3-5 inches using wood shavings, rice hulls, sawdust, or chopped straw |
| Maximum Width | 10m for deep litter houses to ensure proper ventilation |
| House Spacing | Minimum 10m between houses to reduce disease spread |
| Orientation | Long axis east-west to minimize direct sunlight through side walls |
| Common Materials | Concrete (floors/foundation), galvanized iron (cages/roofing), wire mesh (ventilation), treated wood (posts) |
| Free Range Advantages | Low housing cost, reduced feed needs, natural behavior, soil fertility |
| Cage System Advantages | Space efficiency, higher production, better disease control, precise management |
| Deep Litter Advantages | Natural behavior, vitamin B12 production, valuable manure, less flies than cages |
| Major Challenges | Inadequate ventilation, overcrowding, poor drainage, proximity to neighbors, rat infestation |
| Typical Room Capacity | About 50 birds per standard room (subject to adequate ventilation) |
| Brooder Setup | 12-18 inch high sides, 250-watt bulb 18 inches above floor, isolated from adult birds |
Frequently Asked Questions About Poultry Housing Management and Construction
1. What is the best flooring material for a poultry house?
Concrete is the best flooring material for permanent poultry houses. It is sanitary, easy to clean, rat-proof, and relatively inexpensive. Make sure the concrete is 8-10cm thick with a rough surface to prevent birds from slipping. For deep litter systems, cover the concrete with litter materials like wood shavings or rice hulls for warmth and comfort.
2. How many birds can I raise in a standard room?
A typical standard room can house about 50 birds, but this depends on the room size and ventilation quality. The most important factor is ensuring adequate ventilation for the number of birds. For laying hens, you need about 5 birds per square meter in deep litter systems. Always consult an expert before converting existing buildings into poultry houses.
3. What is the minimum distance between my poultry house and my neighbor’s property?
Your poultry house should be at least 10 meters from property lines, and more distance is better. Consider odors, dust, noise, and flies when choosing your location. Some poultry companies have specific setback guidelines. It is recommended to discuss your building plans with neighbors before construction to avoid future conflicts.
4. Which is better for small-scale farming: deep litter or cage system?
For small-scale farming, the deep litter system is usually better. It has lower initial costs, allows birds to express natural behaviors, and produces valuable manure. The cage system requires high upfront investment in cages and structures, though it offers better space efficiency and disease control. Your choice depends on your budget, available space, and production goals.
5. How do I prevent ammonia buildup in my poultry house?
Proper ventilation is key to preventing ammonia buildup. Make sure side walls are only 1-1.5 feet high with wire mesh or open space above for air circulation. The house width should not exceed 10 meters for deep litter systems. Add fresh litter regularly and remove wet or caked litter promptly. Good drainage prevents moisture accumulation that increases ammonia production.
6. Can I use an uncompleted building as a poultry house?
Yes, you can use an uncompleted building for poultry, provided it offers adequate ventilation. However, invite an expert to inspect the space before bringing in birds. This approach works for small numbers of birds. For large-scale commercial operations, you should construct a proper poultry house designed specifically for the number of birds you plan to raise.
7. What type of roof is best for poultry houses in tropical climates?
Gable type roofs work best in tropical countries. They provide good water runoff and heat dissipation. The roof overhang should extend at least 3.5 feet beyond the walls to prevent rain from entering the shed. You can use thatch, tiles, asbestos sheets, or metal roofing depending on your budget. Make sure there is adequate pitch for water drainage.
8. How much space do I need for 100 broiler chickens?
For 100 broiler chickens aged 0-6 weeks, you need approximately 10 square meters of floor space (10-12 birds per square meter). A house size of 5m x 2m works well. As birds grow, you may need to reduce stocking density to prevent overcrowding, which leads to stress, disease, and reduced growth rates.
9. What are the main advantages of the cage system over deep litter?
The cage system offers maximum space efficiency, allowing you to raise more birds in less area (12-15 birds per square meter versus 5 birds per square meter). It provides better disease control since birds do not contact droppings. You can isolate sick birds easily and apply scientific management practices precisely. Production performance is higher because birds save energy by not moving around. However, initial costs are much higher.
10. How do I protect my poultry house from rats?
Use concrete flooring with a rat-proof projection (0.45-0.60 meters wide) at floor level extending around the entire house. Seal all gaps and holes in walls larger than 1 inch. Keep the surrounding area clean and free of feed spillage. Store feed in rat-proof containers. Consider installing concrete drains filled with insecticide solution. Regularly inspect for signs of rat activity and take immediate action if detected.
Do you have any questions, suggestions, or contributions? If so, please feel free to use the comment box below to share your thoughts. We also encourage you to kindly share this information with others who might benefit from it. Since we can’t reach everyone at once, we truly appreciate your help in spreading the word. Thank you very much for your support and for sharing!
Read Also: Methods of Livestock Breeding in the Tropical Environment
Awesome notice….. complete details
Smiles… thank you so much