
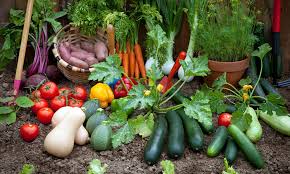
Spring onions and Irish potatoes are valuable crops for home and field gardens. Spring onions offer quick growth and high nutritional value, while potatoes provide a staple food source. This article details cultivation techniques for both crops using surface composting and manure methods. Proper preparation ensures healthy yields.
Spring onions mature rapidly, making them ideal for small-scale nutrition gardens. Their high vitamin C, folate, and peptide content boosts their appeal. Irish potatoes, a global staple, require specific conditions for optimal tuber formation. Both crops benefit from careful soil and blanket management.
This guide outlines practical steps for planting, soil preparation, and harvesting. It emphasizes techniques like surface composting for spring onions and manure use for both crops. These methods promote sustainable growth and minimize environmental impact, ensuring successful harvests.
By following these practices, gardeners can achieve consistent results. From laying strings to correcting acidic soils, each step is designed to enhance crop quality. This article provides clear, actionable advice for growing spring onions and Irish potatoes effectively.
Read Also: BellFlowers – All You Need to Know About
Spring Onion Cultivation with Surface Composting
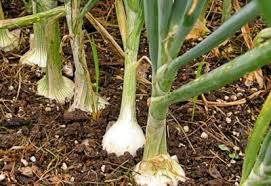
This section covers the surface composting technique for spring onions, focusing on layout, soil preparation, and planting. It ensures optimal growth in 6-10 weeks, ideal for temperate climates and small gardens.
A. Garden Layout and Spacing
Spring onions thrive in temperatures between 12-25°C, maturing in 6-10 weeks. For field-scale planting, prepare triple rows 10cm apart. In home gardens, widen the band to 45cm and plant five rows 10cm apart for efficient space use.
Laying strings ensures precise planting bands. Place a top string between 75cm permanent pegs, then add temporary pegs 25cm down to mark the 25cm-wide composting band. Ensure ropes are taut by lifting and dropping them for straight rows.
This layout maximizes plant density, especially in small gardens. Spring onions’ high density makes them ideal for home nutrition gardens, providing quick, nutrient-rich harvests compared to regular onions, which take longer to mature.
B. Soil Preparation
Remove God’s Blanket downslope of the 25cm planting band to avoid burying undecomposed material. Buried blanket can cause a negative nitrogen period, reducing crop yield. This step ensures the soil remains fertile and supportive of growth.
Soil fracturing is key for loose, healthy soil. Push a fork 30cm deep, pull back slightly to fracture the soil, and remove stones. Avoid lifting or turning the soil to maintain its structure, repeating every 10cm along the row.
To correct acidic soils, sprinkle one handful of wood ash per meter evenly across the 25cm band. This neutralizes acidity, ensuring nutrients are available for spring onions, which are light feeders requiring minimal soil amendments.
C. Surface Composting and Seeding
1. Applying Surface Compost: Place a 2cm layer of surface compost on the 25cm band without working it into the soil. This mimics natural top-feeding systems, providing nutrients as designed by nature for optimal plant growth.
Surface composting supports spring onions’ light feeding needs. By keeping compost on the surface, nutrients are gradually released, reducing the risk of over-fertilization. This method promotes sustainable growth and minimizes soil disturbance.
2. Direct Seeding Process: Press a 2cm deep furrow into the band, repeating every 10cm for three or five rows. Plant seeds 2cm deep, 5cm apart, ensuring good seed-to-compost contact by pinching compost closed and firming with a plank.
After seeding, avoid covering with God’s Blanket until germination. Post-germination, bring the blanket against plant bases, ensuring 100% walkway coverage at 2.5cm thick to suppress weeds and conserve moisture, enhancing growth.
D. Seedling Planting
Spring onions grow well as seedling sets. Plant three seeds per plug and transplant when over 10cm tall. Use a dibble stick to create holes through the blanket, ensuring 10cm spacing between plugs and rows for uniform growth.
Ensure seedling roots are not bent into a J-shape, which hinders growth. The dibble stick hole must match root length to avoid air spaces. Press compost gently around roots at an angle to secure them properly.
Proper seedling planting prevents root damage and ensures healthy establishment. This method supports consistent growth, allowing spring onions to reach harvestable size in 6-10 weeks, ready for market or home use.
Spring Onion Cultivation with Manure
This section details the manure technique for spring onions, focusing on shallow basin preparation and soil management. It ensures rapid growth and high yields in small-scale gardens.
A. Layout and Basin Preparation
For field-scale planting, use triple rows 10cm apart. In home gardens, widen the basin to 45cm with five rows 10cm apart. This layout maximizes space, allowing high-density planting for small-scale nutrition gardens.
Lay strings from 75cm permanent pegs to mark the basin. Place temporary pegs 25cm down to establish the 25cm-wide band. Ensure ropes are taut and straight by lifting and dropping them for accurate row alignment.
Remove God’s Blanket 10cm downslope to expose the soil. This prevents burying undecomposed material, which could reduce yields by causing nitrogen deficiencies. Proper blanket management ensures fertile soil for planting.
B. Soil and Manure Application
1. Soil Fracturing: Push a fork 30cm deep and pull back to fracture the soil, removing stones without turning the soil. Repeat every 10cm along the row to loosen compacted soil, promoting healthy root growth.
Fracturing ensures roots penetrate easily, accessing nutrients and water. This step is critical for spring onions, which require loose soil for optimal bulb development. Avoiding soil turning preserves natural soil structure.
2. Shallow Basin and Manure: Dig a 5cm shallow basin between the 25cm strings, placing soil downslope. Skim a 1cm layer of manure into the basin and rake lightly, then cover with soil to level the surface.
Covering manure with soil creates a separation layer, preventing seed burn. This ensures seeds have safe contact with the soil, promoting germination and healthy growth in the prepared basin.
C. Seeding and Post-Planting
Press 2cm deep furrows every 10cm in the basin for three or five rows. Plant seeds 2cm deep, 5cm apart, pinching soil closed and firming with a plank to ensure good seed-to-soil contact for germination.
Avoid covering the basin with God’s Blanket until germination. Afterward, place the blanket against plant bases, ensuring 2.5cm thick walkway coverage to suppress weeds and conserve moisture, supporting healthy growth.
Spring onions benefit from this manure technique, maturing in 6-10 weeks. The shallow basin and careful soil management promote high-density planting, making this method ideal for small gardens with limited space.
D. Harvesting Spring Onions
Spring onions are harvested 6-10 weeks after transplanting when stems are wide enough. Remove plants, trim roots and tips, and prepare for market. Harvest as needed for regular additions to the vegetable basket.
Read Also: The Effect of Heat Stress on Animal Productivity
Irish Potato Cultivation with Compost/Manure
This section explains the compost and manure technique for Irish potatoes, a staple crop with specific temperature and spacing needs. It covers soil preparation, planting, and harvesting for optimal tuber formation.
A. Crop Characteristics and Layout
Irish potatoes, the world’s fourth-largest crop, have a 17% starch content, making them a staple food. They grow best at 15-25°C, planted from August to January in Southern African summer rainfall regions.
Plant potatoes at 30cm intervals with 75cm between rows on flat or raised beds. This spacing ensures adequate room for tuber development, preventing overcrowding and promoting healthy, uniform growth.
Lay a taut string between 75cm permanent pegs to mark rows. This ensures straight furrows, simplifying planting and maintenance. Proper row alignment is key for efficient field management and optimal yields.
B. Soil Preparation
Remove God’s Blanket 30cm downslope to expose the soil, preventing nitrogen loss from buried, undecomposed material. This step maintains soil fertility, ensuring potatoes have access to necessary nutrients for growth.
If soils are compacted, fracture them to 30cm deep every 75cm. This may be unnecessary with 15cm deep furrows but ensures loose soil for root penetration, supporting healthy tuber formation.
To correct acidic soils, sprinkle 1 tablespoon of wood ash or bonemeal, or 1 teaspoon of lime, every 60cm along planting lines. This neutralizes acidity, making nutrients readily available for potato growth.
C. Planting and Compost/Manure Application
1. Furrow Preparation: Prepare 15cm deep furrows every 75cm, keeping soil close to avoid excessive downslope movement. Deep furrows provide sufficient depth for planting seed potatoes, ensuring proper tuber development.
Furrows allow consistent planting depth, critical for uniform growth. Properly spaced furrows prevent competition between plants, ensuring each potato has enough space and nutrients to develop fully.
2. Compost/Manure Inputs: Spread 500ml of compost or manure per meter in the furrow, then cover with at least 3cm of soil to reach a 10cm planting depth. This provides nutrients while preventing seed burn.
The compost or manure layer fuels tuber growth, while the soil cover ensures safe planting depth. This method supports healthy development, reducing the risk of nutrient overload or seed damage.
D. Planting and Blanket Management
Plant disease-free seed potatoes or tuber cuttings with 2-3 eyes at 30cm intervals in the furrow. Cover level with soil to ensure proper planting depth, promoting consistent germination and tuber formation.
No hilling is needed, but a 5-10cm thick God’s Blanket is essential post-germination. Leave a 5cm gap over the furrow during germination to allow sprouting, then apply the blanket to prevent greening.
The thick blanket conserves moisture and encourages shallow tuber formation, making harvesting easier. It also prevents greening, ensuring tubers remain marketable and free from light-induced defects.
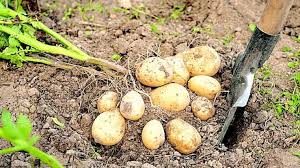
E. Harvesting Potatoes
Harvest potatoes by gently lifting with a fork, as tubers form just below the surface due to the blanket’s moisture conservation. Thicker blankets reduce soil disturbance, making harvesting easier and more efficient.
Frequently Asked Questions
1. Why are spring onions ideal for small gardens?
Spring onions mature in 6-10 weeks with high plant density, making them perfect for small-scale nutrition gardens.
2. What is God’s Blanket, and why is it important?
God’s Blanket is organic material used to cover soil, suppressing weeds and conserving moisture for healthy crop growth.
3. How does soil fracturing benefit spring onions and potatoes?
Fracturing loosens compacted soil, allowing better root penetration and access to nutrients, promoting healthy crop development.
4. Why is a separation layer needed with manure?
A soil layer between manure and seeds prevents seed burn, ensuring safe germination and healthy plant growth.
5. What causes potato tuber greening, and how is it prevented?
Light exposure causes greening. A 5-10cm thick God’s Blanket post-germination prevents light exposure, keeping tubers marketable.
6. When should Irish potatoes be planted in Southern Africa?
Plant from August to January in summer rainfall regions, as temperatures above 27°C stop tuber formation.
7. How does surface composting benefit spring onions?
Surface composting provides gradual nutrient release, supporting light-feeding spring onions without over-fertilization or soil disturbance.
8. Why is good seed-to-soil contact important for spring onions?
Good contact ensures proper germination and nutrient uptake, critical for small spring onion seeds to establish healthy plants.
Do you have any questions, suggestions, or contributions? If so, please feel free to use the comment box below to share your thoughts. We also encourage you to kindly share this information with others who might benefit from it. Since we can’t reach everyone at once, we truly appreciate your help in spreading the word. Thank you very much for your support and for sharing!