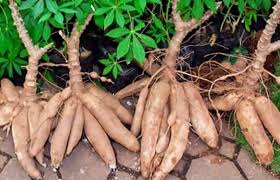
How to grow cassava is an essential topic for those interested in agriculture, particularly in tropical and subtropical regions where this crop thrives. Cassava (Manihot esculenta) is a root vegetable known for its starchy tubers, which are a vital source of carbohydrates for millions of people worldwide.
It is especially popular in Africa, Asia, and South America, where it serves as a staple food and is used to produce various products like flour, chips, and tapioca. Growing cassava can be a rewarding venture due to its resilience, high yield, and relatively low maintenance requirements.
To successfully cultivate cassava, it’s important to understand its growth conditions and best practices. Cassava is a drought-tolerant crop, making it suitable for regions with limited rainfall.
It prefers well-drained sandy or loamy soils rich in organic matter, but it can also adapt to poorer soil conditions. The ideal pH level for cassava growth ranges from 5.0 to 7.0. Additionally, cassava requires full sunlight to grow optimally, so choosing a location that receives adequate light is crucial for a successful harvest.
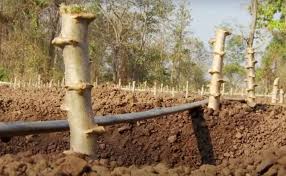
The propagation of cassava is typically done using stem cuttings rather than seeds. Farmers select healthy stems from mature cassava plants, cutting them into sections about 20 to 30 centimeters long. These cuttings should have at least one node, as this is where new roots and shoots will emerge.
The planting of cassava cuttings is usually done at the beginning of the rainy season to ensure sufficient moisture for root development. When planting, the cuttings are inserted into the soil at an angle, with about one-third of the cutting buried to support healthy growth.
Once planted, cassava plants will begin to grow rapidly, usually reaching maturity within 8 to 24 months, depending on the variety and environmental conditions. It’s essential to monitor the plants during their growth period, as they require adequate water, especially during dry spells.
While cassava is drought-resistant, consistent moisture will lead to better yields. Weed control is also vital to prevent competition for nutrients and water; therefore, regular weeding or mulching can help maintain the health of the crop.
Fertilization is another important aspect of cassava cultivation. While cassava can grow in poor soils, applying fertilizers can enhance growth and increase yield. A balanced fertilizer with adequate nitrogen, phosphorus, and potassium should be applied based on soil tests to determine nutrient deficiencies.
Pest and disease management is crucial in cassava farming. While cassava is generally resistant to many pests, it can be affected by cassava mosaic disease, mealybugs, and whiteflies. Regular inspection of the plants can help identify any issues early on, allowing for timely interventions.
Integrated Pest Management (IPM) strategies, such as crop rotation and planting disease-resistant varieties, can also be effective in managing pests and diseases.
Growing cassava can be a productive endeavor with the right knowledge and practices. From selecting the appropriate location and preparing the soil to planting and managing pests, each step plays a crucial role in ensuring a successful harvest.
By understanding how to grow cassava effectively, farmers can contribute to food security and sustainable agriculture in their communities.
Understanding the Benefits of Growing Cassava

1. High Yield Potential: Cassava is known for its high yield potential, making it an attractive crop for farmers. It can produce a significant amount of starch-rich tubers, often yielding more per hectare than many other staple crops.
2. Drought Resistance: Cassava is highly resilient to drought conditions. Its deep root system allows it to access moisture from the soil, making it suitable for regions with erratic rainfall or dry spells.
3. Nutritional Value: Cassava is a good source of carbohydrates and provides essential nutrients such as vitamins and minerals. It can help in food security by providing a staple food that is rich in energy.
4. Multiple Uses: Cassava can be processed into various products, including flour, chips, and tapioca. This versatility allows farmers to tap into different markets and increase their income.
5. Economic Benefits: Growing cassava can improve the livelihoods of farmers due to its relatively low input costs and high market demand, particularly in developing countries.
Selecting the Right Cassava Varieties
1. Local Adaptation: Choose cassava varieties that are well-adapted to your local climate and soil conditions. Varieties that perform well in your region are more likely to yield better results.
2. Disease Resistance: Select varieties that are resistant to common cassava diseases, such as cassava mosaic disease and cassava bacterial blight. Disease-resistant varieties can help reduce crop losses and improve overall yields.
3. Desired Characteristics: Consider the specific traits you want in your cassava, such as root size, starch content, and cooking quality. Different varieties can have varying characteristics that may be better suited for specific uses.
4. Market Demand: Research the market to understand which cassava varieties are in demand. Growing varieties that are popular among consumers can enhance your profitability.
5. Consult Local Experts: Seek advice from agricultural extension services or local agricultural experts. They can provide valuable insights on the best cassava varieties for your specific conditions and goals.
Read Also: Vent Pecking in Poultry and How to Control them
Preparing the Soil for Cassava Planting

1. Soil Testing: Conduct soil tests to determine pH levels and nutrient availability. Cassava thrives in well-drained soils with a pH between 5.5 and 7.0. This information will guide your soil amendment practices.
2. Land Clearing: Clear the land of weeds, stones, and debris. This helps create a clean seedbed, reducing competition for nutrients and water.
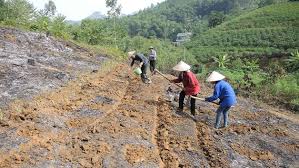
3. Tillage: Plow and till the soil to improve aeration and water retention. Tilling also helps break down large clumps of soil and improves soil structure.
4. Fertilization: Based on soil test results, apply appropriate fertilizers to ensure the soil has adequate nutrients for cassava growth. Common fertilizers include nitrogen, phosphorus, and potassium.
5. Weed Control: Implement effective weed control measures before planting. Weeds can compete with cassava for nutrients and moisture, reducing crop yields.
Planting Cassava: Techniques and Best Practices
1. Choosing Cuttings: Use healthy and disease-free cassava cuttings that are about 20-30 cm long. Cuttings should be taken from mature plants to ensure good sprouting.
2. Planting Time: Plant cassava during the rainy season when soil moisture is adequate. This helps improve germination rates and early plant establishment.
3. Planting Depth and Spacing: Plant cuttings at a depth of about 10-15 cm, with a spacing of 1 meter between rows and 0.8 meters between plants. Proper spacing allows for optimal growth and air circulation.
4. Watering: Ensure that the soil remains moist after planting, especially in the initial growth phase. Adequate moisture is crucial for successful germination and establishment of the plants.
5. Mulching: Apply organic mulch around the plants to conserve soil moisture, suppress weeds, and improve soil fertility as the mulch decomposes.
Watering and Irrigation Requirements for Cassava
1. Water Needs: Cassava requires adequate water for optimal growth. While it is drought-tolerant, consistent moisture during critical growth stages such as root development is essential for maximizing yields.
2. Irrigation Methods: If rainfall is insufficient, consider using irrigation methods such as drip irrigation or furrow irrigation. Drip irrigation delivers water directly to the roots, minimizing water wastage, while furrow irrigation allows for more efficient water distribution along rows.
3. Monitoring Soil Moisture: Regularly check soil moisture levels using soil moisture sensors or simple methods like the feel test. Maintaining soil moisture at 70-80% field capacity during the early growth stage is crucial for better establishment.
4. Watering Schedule: During dry periods, water cassava plants every 7-14 days, depending on soil type and weather conditions. Adjust the frequency based on rainfall and temperature to ensure plants do not experience stress.
5. Avoid Overwatering: While cassava requires moisture, overwatering can lead to root rot and other diseases. Ensure good drainage in the planting area to prevent waterlogging.
Fertilization and Soil Management
1. Soil Testing: Before planting, conduct a soil test to determine nutrient levels and pH. This helps in selecting the right fertilizers and amendments needed for optimal cassava growth.
2. Fertilization Schedule: Apply fertilizers at key growth stages—usually at planting, when the plants are about one month old, and just before flowering. A balanced fertilizer with N-P-K (Nitrogen-Phosphorus-Potassium) ratios tailored to your soil conditions is recommended.
3. Organic Amendments: Incorporate organic matter, such as compost or well-rotted manure, to improve soil structure, enhance nutrient availability, and boost microbial activity in the soil.
4. Mulching: Use organic mulch around cassava plants to retain moisture, suppress weeds, and improve soil fertility as it decomposes. This practice also helps regulate soil temperature.
5. Crop Rotation: Consider rotating cassava with legumes or other crops to improve soil fertility and disrupt pest and disease cycles. This practice enhances soil health and promotes sustainable farming.
Pest and Disease Control in Cassava Farming
1. Regular Monitoring: Conduct regular inspections of cassava plants for signs of pests and diseases. Early detection is key to managing potential threats effectively.
2. Common Pests: Be vigilant for pests such as cassava mosaic virus, mealybugs, and aphids. Implement integrated pest management (IPM) strategies, including biological control, to manage these pests effectively.
3. Cultural Practices: Employ good cultural practices, such as proper spacing and sanitation, to reduce pest infestations. Remove any infected plants promptly to prevent the spread of diseases.
4. Chemical Controls: If necessary, use appropriate pesticides as a last resort. Always follow label instructions and consider using organic or less harmful alternatives to minimize environmental impact.
5. Disease Resistance: Choose cassava varieties that are resistant to common diseases, such as cassava bacterial blight and root rot. Resistant varieties can significantly reduce the need for chemical controls.
Read Also: Best Ways to Prevent and Control Coccidiosis among Poultry Birds
Harvesting Cassava: When and How to Do It

1. Harvesting Time: Cassava is typically ready for harvest 8 to 24 months after planting, depending on the variety and growing conditions. The best time to harvest is when the leaves begin to yellow and drop, indicating that the roots are mature.
2. Signs of Maturity: Check for root size and firmness. Mature cassava roots are usually between 1.5 to 2.5 inches in diameter. They should feel firm when pressed, indicating readiness for harvest.
3. Harvesting Techniques: Use a sharp spade or machete to cut the cassava plants at the base. Carefully lift the roots from the soil, being cautious not to damage them. It’s essential to handle the roots gently to prevent bruising.
4. Harvesting Conditions: Harvest on a dry day to reduce moisture content in the soil, which helps minimize damage to the roots. Avoid harvesting during wet conditions to prevent spoilage.
5. Post-Harvest Handling: After harvesting, remove the leaves and any damaged or rotten roots. Clean the roots gently with water to remove excess soil and prepare them for storage or processing.
Post-Harvest Processing of Cassava
1. Immediate Processing: Cassava roots begin to deteriorate quickly after harvest, so process them as soon as possible. This includes peeling, grating, or slicing, depending on the intended use.
2. Peeling and Grating: Remove the outer skin using a knife or peeler. For products like cassava flour, grate the roots after peeling to ensure a finer texture.
3. Fermentation: For certain traditional products like garri, cassava may undergo fermentation. Soak grated cassava in water for a few days, allowing it to ferment before further processing.
4. Drying: If making flour or chips, drying the cassava is essential. Spread the grated or sliced cassava in a thin layer under the sun or use a dehydrator until completely dry.
5. Storage: Store processed cassava in airtight containers to keep it fresh. Ensure that the storage area is cool and dry to prevent spoilage and insect infestations.
Marketing and Selling Your Cassava Crop
1. Market Research: Before planting, conduct market research to identify potential buyers, such as local markets, restaurants, or food processing companies. Understanding demand helps in planning your production.
2. Value Addition: Consider value-added products like cassava flour, chips, or starch. These products often fetch higher prices and appeal to a broader market, enhancing profitability.
3. Branding and Packaging: Develop a brand for your cassava products. Use attractive packaging that highlights the quality and health benefits of your cassava to attract consumers.
4. Local and Online Markets: Explore selling at local farmer’s markets, grocery stores, or online platforms. Building an online presence can widen your customer base and increase sales opportunities.
5. Networking: Connect with other farmers and local agricultural organizations to share knowledge and resources. Networking can lead to collaborative marketing efforts and access to larger markets.
Do you have any questions, suggestions, or contributions? If so, please feel free to use the comment box below to share your thoughts. We also encourage you to kindly share this information with others who might benefit from it. Since we can’t reach everyone at once, we truly appreciate your help in spreading the word. Thank you so much for your support and for sharing!
Read Also: How to Grow Your Business Quickly and Easily
Frequently Asked Questions
We will update this section soon.

