
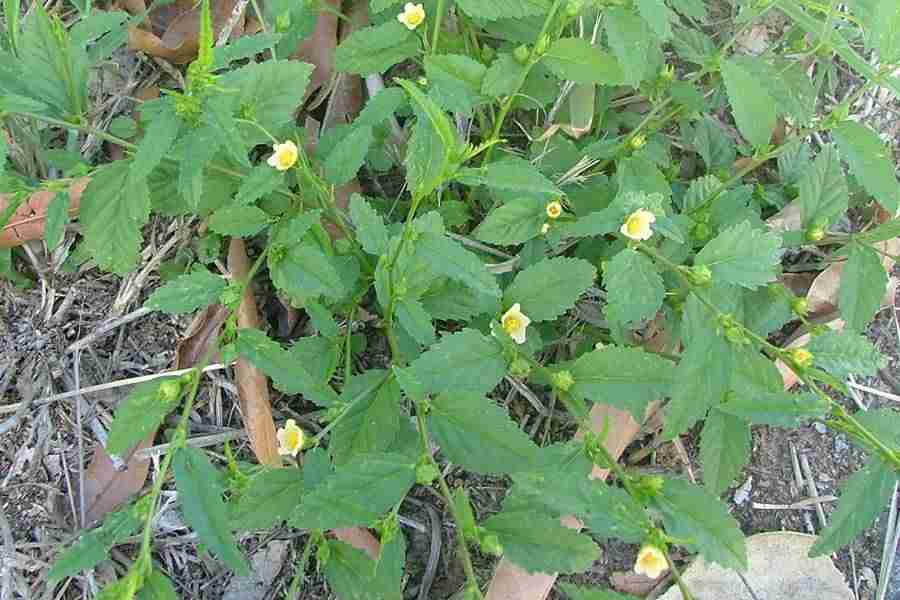
How to Grow Sida Acuta is a journey into cultivating a versatile and resilient plant that offers numerous benefits. Commonly known as wireweed or sida, Sida acuta is a perennial herb native to tropical and subtropical regions. It thrives in various soil types and environmental conditions, making it an excellent choice for both home gardeners and agricultural purposes.
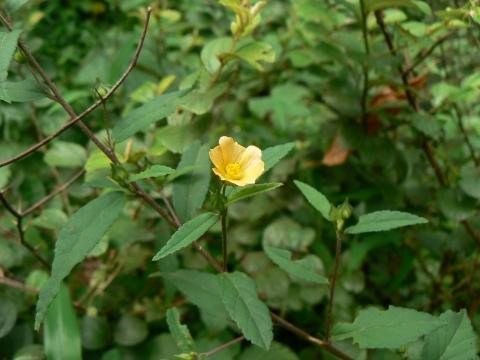
This hardy plant can reach heights of up to 1.5 meters and features slender, upright stems with green, serrated leaves that contribute to its unique aesthetic appeal. Besides its ornamental value, Sida acuta is renowned for its medicinal properties, making it a valuable addition to any garden.
One of the primary reasons for growing Sida acuta is its medicinal uses. Traditionally, different parts of the plant have been utilized in herbal medicine to treat various ailments. It is believed to have anti-inflammatory, analgesic, and antimicrobial properties, making it a popular choice in natural remedies.
The leaves can be brewed into teas or used in poultices, while the roots are often employed in various traditional medicines. As awareness of natural healing methods grows, the demand for plants like Sida acuta continues to increase, presenting a unique opportunity for gardeners and herbalists alike.
When it comes to cultivation, Sida acuta is relatively low-maintenance, making it suitable for beginners and experienced gardeners alike. Understanding its growing conditions and care requirements is essential for successful cultivation. The plant prefers well-drained soil and can thrive in full sun to partial shade, though it typically flourishes in sunny spots. Given its adaptability, it can be grown in various settings, including gardens, pots, or as a ground cover.
Sida acuta is also drought-tolerant, requiring less frequent watering compared to other plants. However, regular watering during dry spells can promote healthier growth and increased yields. Additionally, this plant can benefit from occasional fertilization, particularly during its growing season, to support robust development and flowering.
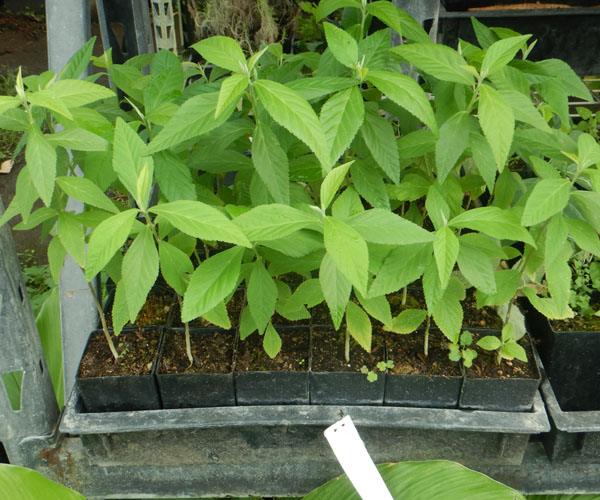
Propagation of Sida acuta can be achieved through seeds or cuttings, both of which are straightforward methods. Seeds can be sown directly into the soil, while cuttings should be taken from healthy, mature plants and placed in a suitable growing medium until roots develop. Once established, Sida acuta will spread rapidly, which can be advantageous for creating dense ground cover or natural barriers in your garden.
Choosing the Right Location for Sida Acuta
1. Climate Considerations: Thrives in warm climates with temperatures 20°C to 30°C (68°F to 86°F); tolerates drought but prefers adequate moisture.
2. Sunlight Requirements: Full sun to partial shade; needs at least 6-8 hours of direct sunlight daily for strong growth and flowering.
3. Soil Type: Adaptable but prefers well-drained sandy or loamy soils; avoid heavy clay to prevent root rot; ideal pH 6.0-7.5.
4. Drainage: Good drainage essential; use raised beds or mounds if soil is heavy.
5. Proximity to Water Sources: Choose accessible spots for easy irrigation during dry periods; avoid flood-prone areas.
6. Companionship with Other Plants: Intercrop with legumes for soil fertility; avoid plants prone to similar pests/diseases.
Soil Preparation for Optimal Growth
1. Soil Testing: Test for nutrients, pH, and texture to guide amendments.
2. Clearing the Area: Remove weeds, rocks, and debris to reduce competition.
3. Tilling the Soil: Loosen to 15-20 cm (6-8 inches) depth for better aeration and root growth.
4. Organic Matter Addition: Incorporate compost or manure for nutrients and moisture retention.
5. Nutrient Amendments: Add balanced fertilizer based on test results.
6. Soil pH Adjustment: Use lime to raise or sulfur to lower pH as needed.
7. Leveling the Soil: Create even beds to prevent water pooling.
Read Also: 7 Medicinal Health Benefits of Daffodils (Narcissus Plant)
Sourcing Healthy Sida Acuta Seeds
1. Reputable Suppliers: Buy from nurseries, garden centers, or online specialists in native/medicinal plants.
2. Local Sources: Prefer local seeds adapted to regional conditions.
3. Seed Quality: Choose plump, uniform, blemish-free seeds; avoid shriveled or moldy ones.
4. Certification: Opt for organic or non-GMO if available.
5. Packaging Date: Select fresh seeds (packaged within last 1-2 years).
6. Germination Rate Information: Check packet for high germination rates.
7. Local Regulations: Verify permits if considered invasive in your area.
Planting Techniques for Sida Acuta
1. Seed Preparation: Soak seeds in water for 24 hours to boost germination.
2. Planting Depth: Sow at 1-2 cm (0.4-0.8 inches) deep.
3. Spacing: 30-45 cm (12-18 inches) apart in rows.
4. Direct Sowing vs. Seedling Transplanting: Direct sow or start indoors and transplant after true leaves develop.
5. Optimal Planting Time: Warm season after frost risk passes.
6. Mulching: Apply organic mulch post-planting for moisture retention and weed suppression.
Read Also: Pests of Stored Products and Damages Caused
Watering Guidelines for Healthy Growth
1. Initial Watering: Thoroughly water after planting to settle soil.
2. Consistent Moisture: Keep moist but not waterlogged.
3. Watering Frequency: Every 2-3 days in dry periods; adjust for rainfall/humidity.
4. Time of Day for Watering: Early morning or late afternoon to minimize evaporation.
5. Deep Watering: Water deeply to encourage strong roots.
6. Observe Plant Signs: Watch for wilting/yellowing and adjust accordingly.
Fertilization Tips for Sida Acuta
1. Soil Testing: Base fertilizer on test results.
2. Balanced Fertilizer: Use 10-10-10 or similar NPK.
3. Application Timing: Every 4-6 weeks during growing season.
4. Side Dressing: Apply granular around base.
5. Organic Options: Compost or manure for natural nutrients.
6. Foliar Feeding: Liquid fertilizer for quick uptake via leaves.
Pest and Disease Management
1. Regular Monitoring: Inspect frequently for early detection.
2. Common Pests: Aphids, spider mites, whiteflies—control with insecticidal soap or neem oil.
3. Beneficial Insects: Attract ladybugs/lacewings with companion flowers.
4. Crop Rotation: Rotate planting sites to prevent buildup.
5. Disease Resistance: Choose resistant varieties if available.
6. Proper Spacing: Ensure airflow to reduce fungal risks.
7. Sanitation Practices: Remove debris and dead material.
Pruning and Maintenance Practices
1. Pruning Techniques: Remove dead/damaged branches; cut leggy growth for bushier form.
2. Timing for Pruning: Early spring before new growth.
3. Removing Weeds: Hand-pull or hoe regularly.
4. Mulching: Reapply organic mulch post-pruning.
5. Water Management: Maintain moisture during dry spells.
6. Fertilization Practices: Fertilize after pruning for recovery.
7. Pest Monitoring: Continue checks post-maintenance.
Harvesting Sida Acuta: When and How
1. Harvest Timing: 3-4 months after planting when lush and green.
2. Harvesting Method: Cut stems/leaves above nodes with sharp tools.
3. Harvesting Leaves: Start from bottom to allow upper growth.
4. Frequency of Harvest: Multiple times per season for regrowth.
5. Storage of Harvested Material: Rinse, store cool/dry or refrigerate.
6. Handling Fresh Harvest: Gentle handling to avoid bruising.
Uses and Benefits of Sida Acuta
1. Nutritional Value: Rich in vitamins A, C, K; minerals like calcium, iron, magnesium.
2. Culinary Uses: Edible leaves/stems in salads, soups, stews, or stir-fries; young leaves raw.
3. Medicinal Properties: Anti-inflammatory, antioxidant, antimicrobial for traditional remedies.
4. Skin Health: Soothes irritation and reduces redness.
5. Soil Improvement: Aerates soil, adds organic matter.
6. Erosion Control: Stabilizes soil on slopes.
7. Biodiversity Support: Attracts pollinators like bees and butterflies.
Summary of How to Grow Sida Acuta
| Section | Key Points |
|---|---|
| Introduction | Sida acuta (wireweed) is a low-maintenance perennial herb up to 1.5m tall, valued for medicinal, ornamental, and ecological benefits; adaptable to tropics/subtropics. |
| Location & Soil | Warm climate (20-30°C), full sun (6-8 hours), well-drained loamy/sandy soil (pH 6.0-7.5), good drainage, companion planting with legumes. |
| Soil Preparation | Test soil, clear area, till 15-20 cm, add organic matter/compost, amend nutrients/pH, level beds. |
| Sourcing & Planting | Buy quality seeds locally/reputably; soak seeds, sow 1-2 cm deep, space 30-45 cm, mulch; plant in warm season. |
| Care (Water/Fertilize) | Initial deep watering, consistent moisture, every 2-3 days dry periods; balanced NPK every 4-6 weeks or organic. |
| Pest/Disease & Maintenance | Monitor pests (aphids etc.), use neem/soap, encourage beneficials, rotate, prune early spring, mulch, sanitize. |
| Harvesting & Uses | Harvest at 3-4 months, cut above nodes repeatedly; edible/nutritious, medicinal (anti-inflammatory), soil/erosion benefits, pollinator support. |
Frequently Asked Questions on How to Grow Sida Acuta
1. What is Sida acuta and why grow it?
Sida acuta, known as wireweed, is a resilient perennial herb valued for its medicinal (anti-inflammatory, antimicrobial), nutritional, and ecological benefits, including soil improvement and pollinator attraction.
2. What climate and sunlight does Sida acuta need?
It thrives in warm tropical/subtropical climates (20-30°C) with full sun to partial shade, requiring at least 6-8 hours of direct sunlight daily for optimal growth and flowering.
3. What soil is best for growing Sida acuta?
Well-drained sandy or loamy soil with pH 6.0-7.5; avoid heavy clay to prevent root rot—improve drainage with raised beds if needed.
4. How do I propagate Sida acuta?
Through seeds (soak 24 hours, sow 1-2 cm deep) or stem cuttings from mature plants; direct sow or start indoors and transplant.
5. How often should I water Sida acuta?
Water thoroughly after planting, then every 2-3 days during dry periods to keep soil consistently moist but not waterlogged; it’s drought-tolerant once established.
6. What fertilizer does Sida acuta require?
Balanced NPK (e.g., 10-10-10) every 4-6 weeks during growing season; organic options like compost work well—base on soil test.
7. How do I manage pests and diseases on Sida acuta?
Monitor regularly; control aphids/spider mites with neem oil or soap; encourage beneficial insects, rotate crops, ensure spacing for airflow, and maintain sanitation.
8. When and how do I prune Sida acuta?
Prune in early spring before new growth; remove dead/damaged parts and leggy stems with sharp tools to promote bushier growth and better circulation.
9. When can I harvest Sida acuta?
Typically 3-4 months after planting; cut mature leaves/stems above nodes regularly to encourage regrowth—harvest from bottom up.
10. What are the main uses of harvested Sida acuta?
Edible in salads/soups (rich in vitamins/minerals); medicinal teas/poultices for inflammation; supports skin health, soil aeration, erosion control, and biodiversity.
Do you have any questions, suggestions, or contributions? If so, please feel free to use the comment box below to share your thoughts. We also encourage you to kindly share this information with others who might benefit from it. Since we can’t reach everyone at once, we truly appreciate your help in spreading the word. Thank you very much for your support and for sharing!
Disclaimer: This article is for educational and informational purposes only. The health benefits described are based on scientific research and traditional knowledge. They ayre not a substitute for professional medical advice, diagnosis, or treatment. Always consult a healthcare professional before using any herb or natural remedy for medical purposes.