
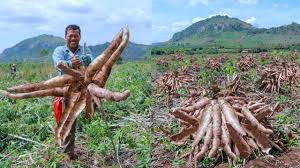
How to plant cassava is an essential topic for anyone interested in sustainable agriculture and food production. Cassava, also known as yuca or manioc, is a versatile root crop native to South America. It is a staple food for millions of people around the world, especially in tropical regions, due to its high carbohydrate content and ability to thrive in poor soil conditions.
With increasing global food demands and changing climate patterns, cassava presents an opportunity for farmers to diversify their crops and improve food security. Planting cassava can be a rewarding endeavor, offering both economic benefits and nutritional value.
To successfully grow cassava, it’s crucial to understand its requirements and best practices for planting. This crop is primarily propagated through stem cuttings, making it relatively easy to establish in various agricultural systems. Selecting healthy, disease-free stems is vital for ensuring a successful crop.
The cuttings should be around 20 to 30 centimeters long and taken from mature plants, ideally with at least 4-5 nodes. This method of propagation allows for faster growth and a higher yield compared to traditional seed methods.
The ideal time to plant cassava is at the beginning of the rainy season, as the crop requires adequate moisture for successful establishment and growth. Before planting, preparing the land is essential. Choose a well-drained, fertile site with sufficient sunlight, as cassava thrives in full sun.
Clear the area of weeds, rocks, and debris, and till the soil to a depth of at least 30 centimeters. Adding organic matter, such as compost or well-rotted manure, can enhance soil fertility and improve moisture retention.
Spacing is also an important consideration when planting cassava. Adequate spacing between the cuttings helps reduce competition for nutrients and allows for proper air circulation.
Generally, a spacing of 1 meter between rows and 0.8 to 1 meter between plants within the row is recommended. This arrangement provides ample room for the plants to grow and facilitates easier management and harvesting.
After planting, it is essential to monitor the crop regularly. Watering is critical during the early stages, especially if rainfall is insufficient. While cassava is drought-resistant once established, young plants are more vulnerable to water stress.
Fertilization may also be necessary, particularly in nutrient-poor soils. Regular weeding will help minimize competition for nutrients and water, promoting healthy growth.
Pests and diseases can affect cassava production, so it’s crucial to adopt integrated pest management strategies. Regular inspections and timely interventions can help manage potential threats, ensuring a healthy crop.
Harvesting cassava typically occurs 6 to 12 months after planting, depending on the variety and growing conditions. The roots should be harvested before they become too large, as this can lead to a woody texture and reduced quality.
Knowing how to plant cassava effectively can lead to successful cultivation and increased food security. With its resilience to various growing conditions, cassava is an excellent crop for farmers looking to enhance their agricultural practices.
Choosing the Right Cassava Variety
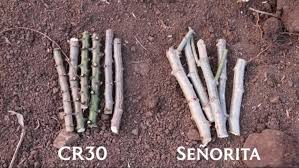
1. Assessing Purpose: When selecting a cassava variety, consider your primary purpose, whether it’s for food production, animal feed, or industrial use. Different varieties may be better suited for specific uses, such as high starch content for processing or drought resistance for tougher environments.
2. Evaluating Yield Potential: Look for varieties that have a proven track record of high yield in your specific region. Consult local agricultural extension services or experienced farmers to identify varieties that perform well in your area’s conditions.
3. Resistance to Pests and Diseases: Choose varieties known for their resistance to common pests and diseases that can affect cassava, such as cassava mosaic disease and root rot. Resistant varieties can help reduce the need for chemical interventions and improve overall crop health.
4. Adaptability to Soil Conditions: Some cassava varieties thrive in specific soil types or conditions. Consider the soil quality and texture of your planting site when selecting a variety to ensure compatibility for optimal growth.
5. Growth Duration: Different cassava varieties have varying growth durations, ranging from early-maturing to late-maturing types. Depending on your local climate and market demands, choose a variety that fits your desired harvesting timeline.
Preparing the Soil for Cassava
1. Soil Testing: Begin by conducting a soil test to determine the nutrient content, pH level, and overall soil health. This will help you understand what amendments are needed to create optimal conditions for cassava growth.
2. Clearing the Land: Clear the land of weeds, rocks, and debris to prepare for planting. This helps reduce competition for nutrients and ensures that cassava plants have ample space to grow.
3. Tilling the Soil: Till the soil to a depth of at least 12-15 inches to improve aeration and drainage. This also helps to break up compacted soil, allowing roots to penetrate more easily and access nutrients.
4. Incorporating Organic Matter: Add organic matter, such as compost or well-rotted manure, to improve soil fertility and structure. This enhances the soil’s water retention capacity and provides essential nutrients for the growing cassava.
5. Adjusting Soil pH: If necessary, adjust the soil pH to the ideal range of 5.5 to 7.0 for cassava. Lime can be added to raise pH levels, while sulfur can help lower them. Follow recommendations from soil tests for appropriate amounts.
Selecting the Planting Location
1. Sunlight Exposure: Choose a location that receives full sunlight for most of the day. Cassava requires at least 6 to 8 hours of sunlight daily to ensure healthy growth and optimal tuber development.
2. Drainage: Select a well-drained site to prevent waterlogging, which can lead to root rot and other diseases. Avoid areas that collect water or have heavy clay soils that retain moisture excessively.
3. Proximity to Water Source: Ensure that your planting location is accessible to a reliable water source for irrigation, especially during dry periods. This is crucial for cassava’s growth, particularly during the early stages.
4. Protection from Winds: If possible, choose a location that offers some protection from strong winds, which can damage young plants. Natural windbreaks, such as trees or shrubs, can be beneficial.
5. Spacing from Other Crops: Consider the spacing from other crops to minimize competition for resources and reduce the risk of pest infestations. It is ideal to plant cassava away from other root crops to prevent the spread of soil-borne diseases.
Read Also: How to Extract and Package Snail Slime (Snail filtrate) for Commercial Use
Steps Involved in Planting Cassava Stem Cuttings
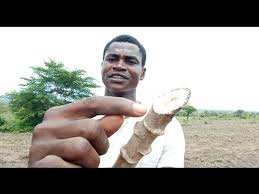
1. Selecting Healthy Cuttings: Choose healthy cassava stems from mature plants that are disease-free. The cuttings should be about 6 to 8 inches long and taken from the middle portion of the stem, as these sections have a higher chance of successful rooting.
2. Preparing the Cuttings: Trim the cuttings at a 45-degree angle to increase the surface area for moisture absorption. Remove any leaves from the lower half of the cuttings to prevent rotting when planted in the soil.
3. Soaking in Water (Optional): Soaking the cuttings in water for a few hours before planting can help to hydrate them and stimulate root development. This step is optional but can enhance the success rate.
4. Preparing the Planting Site: Prepare the soil as previously described, ensuring it’s well-aerated and free of weeds and debris. Mark rows for planting to maintain proper spacing between cuttings.
5. Planting the Cuttings: Plant the cuttings vertically in the soil, burying about one-third of their length. Space the cuttings about 3 to 4 feet apart in rows, ensuring adequate room for the plants to grow.
6. Covering the Cuttings: Gently cover the cuttings with soil, pressing down lightly to remove air pockets. Water the area immediately after planting to settle the soil around the cuttings.
7. Mulching (Optional): Adding a layer of organic mulch around the plants can help retain moisture, suppress weeds, and regulate soil temperature. This is especially useful in hot climates.
Watering and Irrigation Practices
1. Initial Watering: Water the cassava plants immediately after planting to help establish roots. Ensure that the soil is moist but not waterlogged, as excessive moisture can lead to rot.
2. Regular Watering: Maintain consistent moisture in the soil, especially during the first few months after planting. Water the plants at least once a week, or more frequently during dry spells.
3. Irrigation Systems: Consider implementing a drip irrigation system for more efficient water delivery. This method conserves water and allows for targeted watering, minimizing waste and reducing the risk of fungal diseases.
4. Monitoring Soil Moisture: Use a moisture meter or check the soil manually to assess moisture levels. Adjust watering frequency based on rainfall, soil type, and growth stage of the cassava.
5. Watering in the Morning: Water the plants early in the morning to reduce evaporation and allow time for the leaves to dry before evening. This helps prevent fungal diseases that thrive in humid conditions.
Fertilization and Nutrient Management
1. Soil Testing: Before planting, conduct a soil test to determine nutrient levels and pH. This will guide you in selecting the appropriate fertilizers and amendments for your cassava crop.
2. Applying Basal Fertilizer: Use a balanced fertilizer with a nutrient ratio suitable for cassava, such as NPK (Nitrogen-Phosphorus-Potassium) 15-15-15. Apply this as a basal fertilizer during planting to provide essential nutrients.
3. Top-Dressing: After about 2 to 3 months of growth, apply a second round of fertilizer as a top-dressing to promote healthy growth. This can be a nitrogen-rich fertilizer to support foliage development.
4. Organic Fertilizers: Consider incorporating organic fertilizers like compost or well-rotted manure to improve soil fertility and structure. Organic matter also enhances microbial activity, benefiting plant health.
5. Monitoring Nutrient Deficiencies: Regularly observe your cassava plants for signs of nutrient deficiencies, such as yellowing leaves or stunted growth. Adjust your fertilization strategy as needed to address any deficiencies.
Read Also: The Health Benefits of Using Accent Seasoning on your Cooking
How to Space Cassava Planting
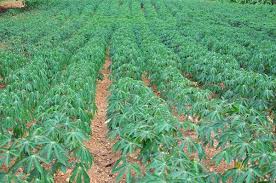
1. Row Spacing: When planting cassava, it is recommended to space rows about 3 to 4 feet apart. This allows enough room for the plants to grow without competing for light and nutrients.
2. Plant Spacing Within Rows: Within each row, space individual cassava cuttings about 3 to 4 feet apart. This spacing helps ensure proper air circulation and reduces the risk of pest infestations and diseases.
3. Factors Influencing Spacing: Adjust spacing based on factors such as soil fertility, variety, and growth conditions. In fertile soils, you might reduce spacing slightly, while in less fertile soils, wider spacing may be beneficial.
4. Consideration of Variety: Different cassava varieties may require different spacing. Consult with local agricultural experts or extension services for specific recommendations based on the variety you are planting.
5. Utilizing Intercropping: Consider intercropping with compatible plants (such as legumes) to maximize land use while maintaining proper spacing for cassava.
6. Using Planting Guides: Utilize planting guides or templates to mark out spacing accurately before planting. This will help ensure even spacing and reduce labor during planting.
Pest and Disease Management in Cassava
1. Regular Monitoring: Conduct regular inspections of your cassava plants for signs of pests and diseases. Early detection is crucial for effective management and reducing crop losses.
2. Common Pests: Be vigilant against common pests such as cassava mealybugs, whiteflies, and aphids. Use insect traps or natural predators to help control these pests without relying solely on chemical pesticides.
3. Disease Identification: Familiarize yourself with common cassava diseases like cassava mosaic disease, bacterial blight, and root rot. Learn to identify symptoms early so you can take action promptly.
4. Cultural Practices: Implement good agricultural practices such as crop rotation, proper spacing, and weed management to minimize pest and disease incidence. Healthy plants are less susceptible to infections.
5. Organic Control Measures: Use organic pesticides, neem oil, or insecticidal soaps to manage pests. For diseases, ensure proper plant spacing and airflow to reduce humidity around the plants, helping to prevent fungal infections.
6. Removing Infected Plants: If you detect any plants showing signs of severe pest infestations or diseases, remove and destroy them immediately to prevent the spread to healthy plants.
Harvesting Cassava: When and How
1. Timing the Harvest: Cassava is typically ready for harvest between 8 to 24 months after planting, depending on the variety and growing conditions. The optimal time for harvesting is when the leaves start to yellow and the lower leaves begin to drop off. This indicates that the tubers have reached their maximum size and starch content.
2. Checking for Maturity: To check if cassava tubers are mature, gently dig around the base of a plant to inspect the size of the tubers. Mature tubers are usually firm and have a diameter of 1 to 4 inches.
3. Harvesting Techniques: Use a sharp, clean spade or machete to carefully uproot the cassava plants. Start by loosening the soil around the roots and tubers before pulling the plant upwards. Be cautious not to damage the tubers during this process.
4. Removing the Tubers: Once the plant is uprooted, gently pull the tubers away from the roots. Shake off any excess soil but do not wash them, as excess moisture can lead to spoilage.
5. Handling with Care: Handle the harvested cassava tubers with care to avoid bruising or cuts, which can make them susceptible to diseases during storage.
6. Post-Harvest Timing: It’s best to harvest cassava in the dry season when the soil is less sticky. This will facilitate easier harvesting and handling of the tubers.
Post-Harvest Processing of Cassava
1. Cleaning the Tubers: After harvesting, clean the cassava tubers to remove soil and debris. Use a brush or cloth to wipe off any remaining dirt without washing them, as water can lead to decay.
2. Cutting for Storage: Cut the tubers into smaller sections if they will not be processed immediately. This helps to reduce the amount of spoilage, as the larger surface area allows for quicker drying if stored improperly.
3. Drying the Tubers: If not used fresh, cassava can be dried to extend its shelf life. Slice the tubers thinly and spread them out in a single layer on drying racks or trays in a well-ventilated area away from direct sunlight.
4. Storing Cassava: Store fresh cassava in a cool, dry place. Ideally, it should be used within a few days of harvesting for the best quality. If dried, store the processed cassava in airtight containers to prevent moisture absorption.
5. Processing for Flour or Chips: Cassava can be processed into flour, chips, or other products. For flour, peel and grate the tubers, then dry them before grinding into flour. For chips, slice the tubers thinly, fry or bake them, and then store in an airtight container.
6. Quality Control: Regularly inspect stored cassava for signs of spoilage or pest infestation. Remove any affected tubers to prevent spreading.
Do you have any questions, suggestions, or contributions? If so, please feel free to use the comment box below to share your thoughts. We also encourage you to kindly share this information with others who might benefit from it. Since we can’t reach everyone at once, we truly appreciate your help in spreading the word. Thank you so much for your support and for sharing!
Read Also: A Child’s Guide to Castle Grayskall Toys: The Perfect Gift for Your Little Knight or Princess
Frequently Asked Questions
We will update this section soon.