
Mushroom farming is an exciting and rewarding way to grow fresh produce right in the comfort of your home. This type of farming has gained popularity in recent years as more people recognize the nutritional benefits and culinary versatility of mushrooms. Unlike traditional crops, mushrooms don’t require soil, sunlight, or a large space, making them perfect for urban gardeners, hobbyists, and even those with limited space.
Home mushroom farming allows you to cultivate various mushroom types like oyster, shiitake, and button mushrooms, providing fresh ingredients for your meals while reducing your carbon footprint.
Mushrooms are fungi, not plants, which makes their cultivation process quite different from growing vegetables or fruits. They thrive in dark, humid environments, feeding off organic material rather than relying on photosynthesis. This unique characteristic allows mushroom farming to fit easily into various home environments, from basements to closets, or even a small shelf in a room with proper humidity and temperature.
By using materials like straw, sawdust, coffee grounds, or specialized mushroom-growing kits, you can create a productive mushroom farm at home, even if you’re a complete beginner.
One of the major benefits of mushroom farming at home is its low cost and sustainability. Since mushrooms grow on materials that are often considered waste, like coffee grounds or straw, they can help reduce waste and recycle nutrients back into the ecosystem. Growing your own mushrooms also means you have control over the entire process, ensuring that no harmful chemicals or pesticides are used.
This makes homegrown mushrooms a great choice for health-conscious individuals and families looking for organic produce without the premium price tag.
Getting started with mushroom farming is relatively simple. You can begin with a mushroom growing kit, which usually includes everything you need, or go the DIY route by sourcing mushroom spawn and substrate materials separately. Mushroom spawn, which is the equivalent of seeds for plants, can be bought online or at garden centers.
Once you have the necessary materials, you’ll need to prepare a growing space that maintains the right balance of temperature, humidity, and ventilation. Many beginners start with oyster mushrooms, as they are among the easiest to grow and can adapt to various growing conditions.
Home mushroom farming can be a satisfying hobby that yields delicious rewards. Watching mushrooms grow from tiny pinheads into mature, harvestable fungi is a fascinating process, and it only takes a few weeks to see the fruits of your labor.
In addition to being a fun project, growing mushrooms at home can also provide a steady supply of nutritious food, as mushrooms are rich in vitamins, minerals, and antioxidants.
Whether you’re interested in adding variety to your diet, reducing your environmental impact, or simply exploring a new gardening venture, mushroom farming offers a practical and enjoyable way to grow your own food.
Benefits of Growing Mushrooms at Home
1. Fresh and Nutrient-Rich: Homegrown mushrooms are fresher and retain more nutrients compared to store-bought varieties. They are packed with essential nutrients like B vitamins, potassium, and protein, which support overall health and well-being.
2. Cost-Effective: Growing mushrooms at home is an affordable way to enjoy this healthy food regularly. Once you have a starter kit or the necessary materials, mushroom farming is cost-effective, providing continuous harvests for minimal investment.
3. Space Efficiency: Mushrooms can be grown in small spaces, making them ideal for home settings. Whether you have a small apartment or a spacious backyard, you can grow mushrooms in containers, jars, or even on shelves, maximizing your available space.
4. Minimal Maintenance: Compared to many other crops, mushrooms require very little maintenance. They do not need sunlight and thrive in controlled, low-light environments, making them easy to manage for busy individuals.
5. Eco-Friendly: Mushroom cultivation has a low environmental impact. It typically requires fewer resources, such as water and energy, and can be grown on recycled or waste materials like coffee grounds, reducing your carbon footprint.
6. Mental Health Benefits: Gardening and growing food can have positive effects on mental health, and mushroom farming is no exception. The process of cultivating, nurturing, and harvesting mushrooms can be therapeutic and rewarding, offering stress relief and a sense of accomplishment.
Types of Mushrooms Suitable for Home Farming
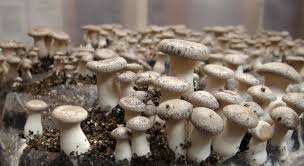
1. White Button Mushrooms: The most common and beginner-friendly mushroom to grow at home. They have a mild flavor and versatile culinary uses, thriving in controlled indoor environments with ease.
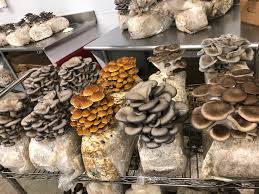
2. Oyster Mushrooms: These mushrooms are popular for home growers due to their fast growth and unique taste. Oyster mushrooms come in various colors, including blue, pink, and yellow, adding visual appeal to your harvest. They can grow on a range of substrates, from coffee grounds to straw.
3. Shiitake Mushrooms: Known for their rich, savory flavor, shiitake mushrooms are a favorite in Asian cuisine. They prefer hardwood substrates, like sawdust or logs, making them slightly more challenging but very rewarding for home growers.
4. Lion’s Mane Mushrooms: These mushrooms are gaining popularity for their unique appearance and potential health benefits, particularly for brain health. Lion’s mane mushrooms grow well on sawdust blocks and thrive in low-light conditions.
5. Reishi Mushrooms: Often used in traditional medicine, reishi mushrooms have a tough, woody texture. They require a longer growing period and are usually grown for their medicinal properties rather than culinary uses.
6. Maitake (Hen of the Woods): Maitake mushrooms are valued for their earthy flavor and health benefits. They grow best on hardwood logs and are well-suited for more experienced growers looking to try something unique.
Understanding the Mushroom Growth Cycle
1. Spore Germination: The cycle begins with spore germination, where microscopic spores develop into mycelium, the root-like structure of the mushroom. Mycelium spreads through the substrate, absorbing nutrients and forming a network that will eventually produce mushrooms.
2. Colonization: During colonization, the mycelium spreads throughout the substrate, feeding on its nutrients. This stage can take several weeks and requires a dark, humid environment to ensure healthy growth. Once the mycelium fully colonizes the substrate, it’s ready to start producing mushrooms.
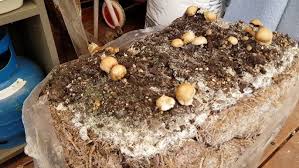
3. Fruiting Initiation: In the fruiting stage, the mycelium begins to form mushroom “pins” or small growths. The environment changes slightly during this stage, as mushrooms require a lower temperature and increased humidity to encourage fruiting.
4. Mushroom Development: As the pins grow, they mature into full-sized mushrooms. This phase usually takes between 5 to 10 days, depending on the mushroom type. Consistent moisture and proper airflow are key to developing healthy mushrooms.
5. Harvesting: Once the mushrooms reach their desired size, they are ready for harvest. The timing depends on the mushroom type, but most are ready when the caps open and the gills are exposed. Harvesting at the right time ensures optimal flavor and nutrient content.
6. Re-Cropping: Many mushroom species allow for multiple flushes, meaning you can harvest several crops from one substrate. After the initial harvest, rest the substrate for a short period, then reintroduce the ideal growing conditions for continued production.
Read Also: 11 Medicinal Health Benefits of Barbarea vulgaris (Yellow Rocket)
Selecting the Right Growing Space
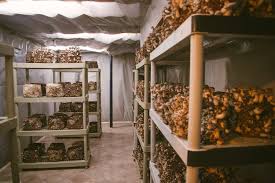
1. Indoor Space Considerations: Most mushrooms thrive in low-light, humid, and cool environments, so basements, closets, or unused rooms can work well. Avoid direct sunlight and places with too much airflow, as mushrooms need stable conditions to grow effectively. Additionally, ensure the space has adequate ventilation to prevent excess humidity, which could lead to mold.
2. Temperature and Humidity Control: Different mushroom varieties have specific temperature and humidity needs. For example, white button mushrooms thrive in cooler temperatures (55–60°F), while oyster mushrooms can handle slightly warmer conditions (60–75°F). Using a hygrometer and thermometer can help you monitor and control these factors. Humidifiers are helpful for keeping humidity levels high, around 80–95%, which is optimal for most mushroom types.
3. Size and Accessibility: Select a space that is easy to access for daily maintenance tasks like watering and checking the progress. The area should be large enough to house the necessary containers or shelves, allowing for airflow around each growing medium. A modular or multi-shelf setup is ideal for maximizing yield in limited spaces.
Essential Materials and Tools for Mushroom Farming
1. Growing Containers or Bags: Depending on your setup, you may need trays, buckets, or specialized mushroom-growing bags. These containers hold the substrate and keep the environment moist. Mushroom bags, for instance, are great for beginners as they allow the substrate to breathe and are less prone to contamination.
2. Substrate Ingredients: The substrate is the growth medium that provides nutrients to the mushrooms. Common substrates include straw, sawdust, coffee grounds, and hardwood pellets. The type of substrate varies by mushroom species; oyster mushrooms, for example, grow well on straw or coffee grounds, while shiitake mushrooms prefer hardwood.
3. Hygrometer and Thermometer: These tools are essential for monitoring the humidity and temperature within your growing space. Mushrooms are very sensitive to these factors, and small fluctuations can affect their growth and yield.
4. Humidifier and Spray Bottle: A humidifier is ideal for maintaining overall humidity levels, while a spray bottle helps you mist the substrate directly. This ensures that the growing environment stays moist, which is crucial for mushroom development, especially during the fruiting stage.
5. Gloves and Sanitizer: To prevent contamination, always handle the substrate and spawn with clean gloves and sanitize any tools used in the process. Mushrooms are highly sensitive to bacteria and other microorganisms, so maintaining a clean workspace is essential for success.
Preparing the Mushroom Substrate
1. Choosing and Preparing the Substrate: Different mushrooms thrive on different substrates. Once you’ve selected the appropriate substrate, prepare it by cutting it into small pieces or grinding it down to increase the surface area for the mycelium to colonize. This step is especially important when using straw or hardwood chips.
2. Pasteurization or Sterilization: This step is crucial for reducing contaminants. For pasteurization, soak the substrate in hot water (around 160°F) for about an hour. This kills off most unwanted organisms while retaining beneficial ones. For sterilization, you’ll need a pressure cooker to heat the substrate at a higher temperature, usually 250°F for 90 minutes, which kills all microbial life.
3. Cooling the Substrate: Allow the substrate to cool completely before spawning. This prevents heat from damaging the mushroom spores and makes it safe to handle. Once the substrate is at room temperature, it’s ready for the next stage in the growing process.
Read Also: 10 Medicinal Health Benefits of Artichoke (Cynara scolymus)
Spawning: Starting Your Mushroom Crop
1. Adding Spawn to the Substrate: Once the substrate is ready, mix in the mushroom spawn, which is essentially the “seed” of the mushrooms. Spawn can come in various forms, such as grain, sawdust, or plug spawn. Evenly distribute the spawn throughout the substrate to ensure uniform growth.
2. Mixing and Packing the Substrate: Thoroughly mix the spawn into the substrate, ensuring that it’s evenly distributed for consistent growth. If using a growing bag, pack the substrate snugly but not too tightly, leaving enough space for air circulation. For containers, layer the substrate and spawn to encourage even mycelium spread.
3. Sealing and Storing the Substrate: After mixing, loosely seal the container or growing bag. Make sure there are small holes or filters to allow for gas exchange, as the mycelium needs oxygen to grow. Place the container in your chosen growing space, maintaining the recommended temperature and humidity for your mushroom variety.
4. Incubation Period: During this phase, the mycelium begins to colonize the substrate, forming a white, web-like network. This period lasts between 2 to 4 weeks, depending on the mushroom type and growing conditions. It’s crucial to maintain a dark, humid environment during incubation and check periodically for signs of contamination or dryness.
Maintaining Optimal Growing Conditions
1. Monitoring Temperature and Humidity: Mushrooms need stable temperature and humidity levels to thrive. Most species grow well in temperatures between 55–75°F, depending on the variety, while humidity should remain high—between 80–95%. You can use a hygrometer and thermometer to monitor these conditions and make adjustments as necessary. If the humidity drops, lightly mist the substrate or use a humidifier to maintain the ideal environment. In colder weather, consider a heat mat or small heater to regulate temperature in the growing area.
2. Ensuring Proper Air Circulation: While mushrooms need a humid environment, they also require fresh air to avoid staleness, which can lead to mold and other contaminants. Make sure your growing containers or bags have small air holes for ventilation. For larger setups, placing a small fan nearby—without pointing it directly at the mushrooms—can help keep the air moving. Aim for gentle airflow, as strong air currents can dry out the substrate.
3. Managing Light Exposure: Most mushrooms grow well in low-light or indirect light conditions, as they do not rely on photosynthesis. Natural daylight in a shaded room or dim fluorescent lighting for a few hours each day is usually sufficient. Avoid direct sunlight, as it can dry out the growing environment. Remember, some light is beneficial for pinning (the formation of baby mushrooms), especially with certain species like oyster mushrooms.
4. Checking for Contaminants Regularly: Fungi are highly sensitive to contaminants, so it’s crucial to monitor your setup frequently. Look for any signs of mold (green, black, or yellow patches) or strange odors. If you spot contamination, it’s best to remove the affected area promptly, or in severe cases, discard the entire batch to prevent it from spreading.
Harvesting Your Homegrown Mushrooms
1. Recognizing the Right Harvest Time: Mushrooms are ready for harvest when their caps are fully formed but still firm. For species like button mushrooms, pick them before the caps start to flatten. Oyster mushrooms are best harvested when the caps have a slight curl but haven’t flattened completely. This stage often falls around 3–5 days after pinning, though the exact timing varies by species and growing conditions.
2. Harvesting Technique: Use clean hands or sterilized scissors/knives to harvest your mushrooms. For mushrooms growing in clusters, like oyster mushrooms, cut them at the base where they connect to the substrate. This approach minimizes disturbance to the surrounding growth, allowing new mushrooms to develop. Avoid pulling or twisting, as this can damage the mycelium and affect subsequent harvests.
3. Encouraging Multiple Harvests: Many mushroom varieties can yield multiple flushes (harvest cycles) if the substrate is well-maintained. After the first harvest, give the substrate a brief resting period, maintaining moisture and proper conditions. Over the next few weeks, new pins should form, leading to additional harvests. Most substrates yield 2–3 flushes before nutrients are depleted.
Common Challenges in Home Mushroom Farming
1. Dealing with Mold and Contamination: Mold growth is one of the most common challenges in mushroom farming. If you notice contamination, act quickly to prevent it from spreading. In minor cases, you can trim off the affected areas and monitor the rest. However, severe contamination often requires discarding the entire batch. To prevent mold, always sterilize tools, keep the growing area clean, and avoid over-wetting the substrate.
2. Managing Overdrying or Over-Watering: Too much or too little moisture can stunt mushroom growth. If the substrate appears dry, mist it gently but avoid soaking, as excess water can encourage mold. On the other hand, if you notice pooling water or excessive condensation, reduce misting and improve airflow. Striking the right balance is key to successful growth.
3. Preventing Insect Infestations: Insects, especially flies, can be attracted to mushrooms and substrates. To prevent infestations, keep your growing area covered with mesh or fine netting. Check for signs of larvae in the substrate, as these can damage mushrooms. If you discover an infestation, removing affected areas and improving ventilation can help control the issue.
Tips for Storing and Using Fresh Mushrooms
1. Storing Fresh Mushrooms Properly: Fresh mushrooms can last up to a week when stored correctly. Place them in a paper bag or loosely covered container in the refrigerator. Avoid using plastic bags, as these can trap moisture and lead to spoilage. If the mushrooms appear slightly damp, add a paper towel to the container to absorb excess moisture.
2. Freezing for Long-Term Storage: If you have a large harvest and want to preserve some mushrooms for later use, freezing is a good option. Clean the mushrooms, slice them if desired, and briefly sauté or blanch them before freezing. This step preserves flavor and texture. Pack the mushrooms in airtight containers or freezer bags, and store them for up to six months.
3. Drying Mushrooms for Extended Shelf Life: Drying is another effective preservation method. You can air dry mushrooms by spreading them on a screen or dehydrator tray. Once fully dried, store them in an airtight container in a cool, dark place. Dried mushrooms can last for over a year and can be rehydrated in warm water for cooking.
4. Using Fresh Mushrooms in Cooking: Fresh mushrooms add rich flavor and texture to various dishes, from soups and sauces to stir-fries and omelets. Clean them with a damp cloth or rinse briefly before using. To bring out their best flavor, sauté mushrooms with a bit of oil or butter, allowing them to brown slightly before adding other ingredients.
Do you have any questions, suggestions, or contributions? If so, please feel free to use the comment box below to share your thoughts. We also encourage you to kindly share this information with others who might benefit from it. Since we can’t reach everyone at once, we truly appreciate your help in spreading the word. Thank you so much for your support and for sharing!
Read Also: Living a Zero Waste Lifestyle: A Complete Guide
Frequently Asked Questions
We will update this section soon.