

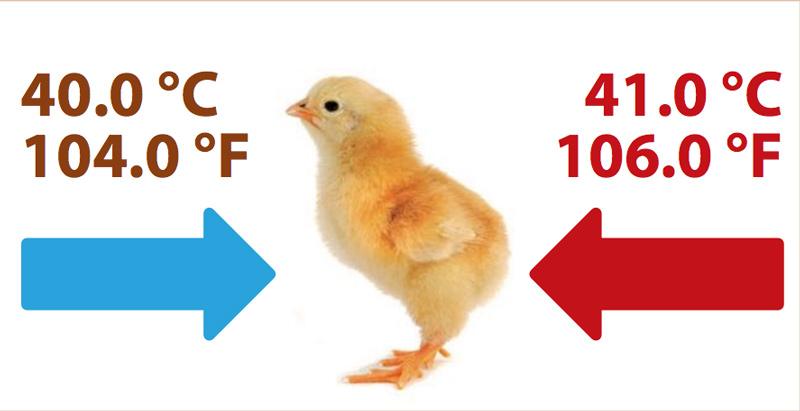
Brooding is how you raise baby chicks during their first few weeks of life. When chicks hatch, they can’t control their body temperature yet. It takes about two weeks for them to develop this ability. Without proper care, they can get too cold, which leads to death, slow growth, or poor feather development.
There are two main ways to brood chicks. Natural brooding uses a mother hen to keep chicks warm. Artificial brooding uses equipment like heat lamps or brooders when you don’t have a hen. Most commercial farms use artificial brooding.
You’ll need to brood chicks for about 4 weeks. Here’s what that looks like: start at 32-34°C in week 1, drop to 30-32°C in week 2, then 28-30°C in week 3. By week 4, chicks have enough feathers to keep themselves warm. Going beyond 4 weeks actually causes problems like stress and overheating.
The whole process starts with incubation. A fertile egg takes about 21 days to hatch at roughly 37.5°C with 55-65% humidity. After hatching, chicks need extra heat until they can handle normal room temperatures.
Quick Facts About Brooding
1. Temperature control: Get this right and your chicks will feather out quickly and grow well. Drop the temperature gradually each week.
2. Space matters: As chicks grow, they need more floor space, feeder space, and access to water. Cramming too many birds together leads to stress, fighting, and pecking.
Read Also: Layers Management: Pullets (Day Old Chicks) Vs Point of Lay (Layers) which is Better?
1. Brooding Temperatures for Chicks
Start day-old chicks at 87-92°F (30-33°C) with humidity between 40-60%. Drafts are your enemy here. Even a small breeze can chill chicks fast.
Lower the temperature by about 4°F (2°C) each week until you reach around 70°F (21°C).
Watch how your chicks act. They’ll tell you if something’s wrong:
1. Cold chicks: They pile up under the heat source. Turn up the heat.
2. Hot chicks: They pant, spread their wings, look tired, or move away from the heat. Lower the temperature.
3. Happy chicks: They spread out evenly and stay active (except when sleeping).
Keep the bedding dry. Wet litter kills more chicks on small farms than almost anything else. Check the temperature at the edge of the brooder, about 4-6 inches off the floor. Keep the room temperature below 75°F (24°C) at first so feathers develop properly.
Temperature Schedule:

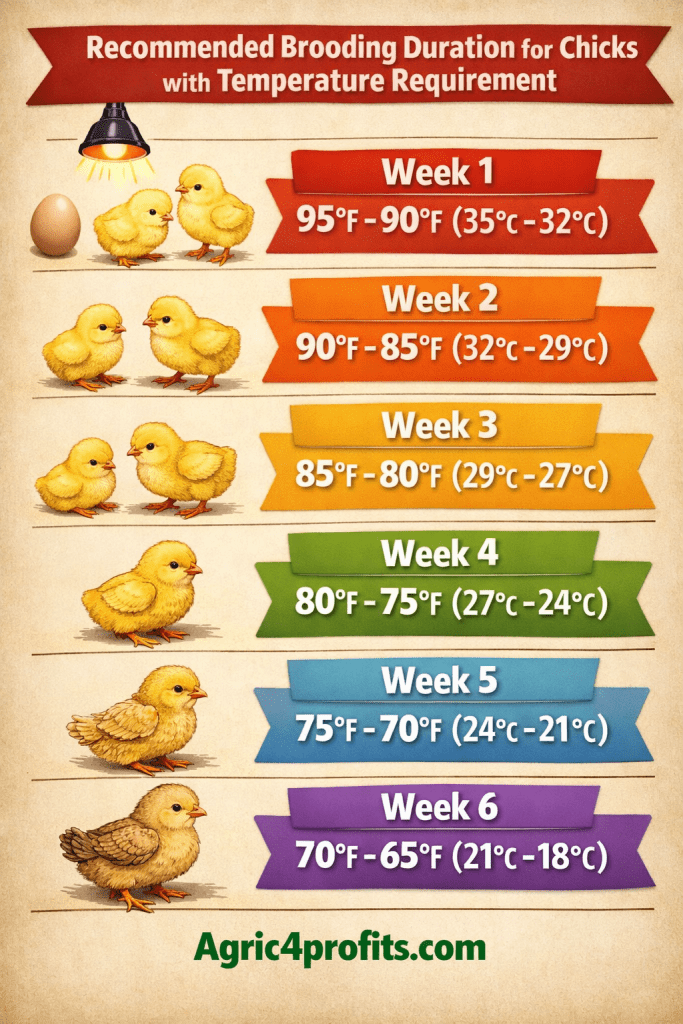
1. 0-1 week: 93-95°F (33.9-35°C)
2. 1-2 weeks: 88-90°F (31.1-32.2°C)
3. 2-3 weeks: 83-85°F (28.3-29.4°C)
4. 3-4 weeks: 78-80°F (25.6-26.7°C)
5. 4-5 weeks: 75°F (23.9°C)
6. 5-6 weeks: 70°F (21.1°C)
7. 6 weeks and over: Comfort zone 50-70°F (10-21.1°C)
2. Brood Lighting for Chicks
Give chicks 20-22 hours of light per day for the first 2 days. Keep it at 10 lux (that’s about 1 foot-candle). This helps them find food and water. After that, cut back gradually to about 12 hours of light by 8 weeks. This gets them ready for natural daylight or whatever lighting schedule you’ll use later.
Bright light can stress chicks and lead to pecking. Keep it dim. Red or blue-tinted light works better than white light for reducing aggression.
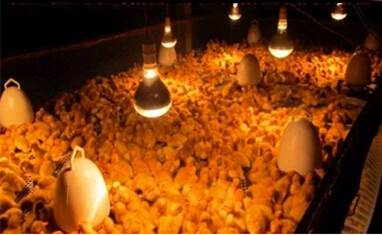
Most farmers prefer incandescent bulbs for brooding. They provide both heat and light. LED bulbs don’t give off much heat, so you’ll need a separate heat source if you use them. Infrared bulbs are popular because they heat without bright light, which helps chicks rest better at night.
Whatever you choose, keep backup bulbs on hand. A failed heat source overnight can kill your whole batch.
3. Brooder Types and Components
A brooder is basically any setup that provides heat to chicks. Here are the main types:
A. Electric Brooders
1. Infrared bulbs: Common and cheap. Usually 250 watts. Hang them about 18 inches above the floor. Watch for fire hazards.
2. Electric hover brooders: Metal canopy that radiates heat downward. More efficient than bulbs. Can hold 300-500 chicks.
3. Radiant heaters: Modern option with precise temperature control. More expensive upfront but cheaper to run.
B. Gas Brooders
These use natural gas or propane. Good for large operations. Heat 800-1,000 chicks per unit. Need proper ventilation to avoid carbon monoxide buildup.
C. Alternative Heat Sources
1. Charcoal stoves: Used in areas without electricity. Require constant attention and good ventilation.
2. Kerosene brooders: Another off-grid option. Must monitor for fumes.
3. Hot water pipes: Some farms run heated water through pipes in the floor. Expensive to set up but very efficient.
D. Brooder Components
Reflectors (hovers): Direct heat downward and stop it from escaping. Usually made of metal or heat-resistant material.
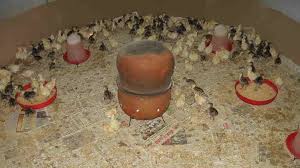
Brooder guards: Circular barriers (cardboard, metal, or wire) that keep chicks near heat, food, and water. Use them for the first 7-10 days.
Thermometers: Place several around the brooder at chick height. Don’t rely on just one reading.
4. Water and Feed Requirements for Chicks
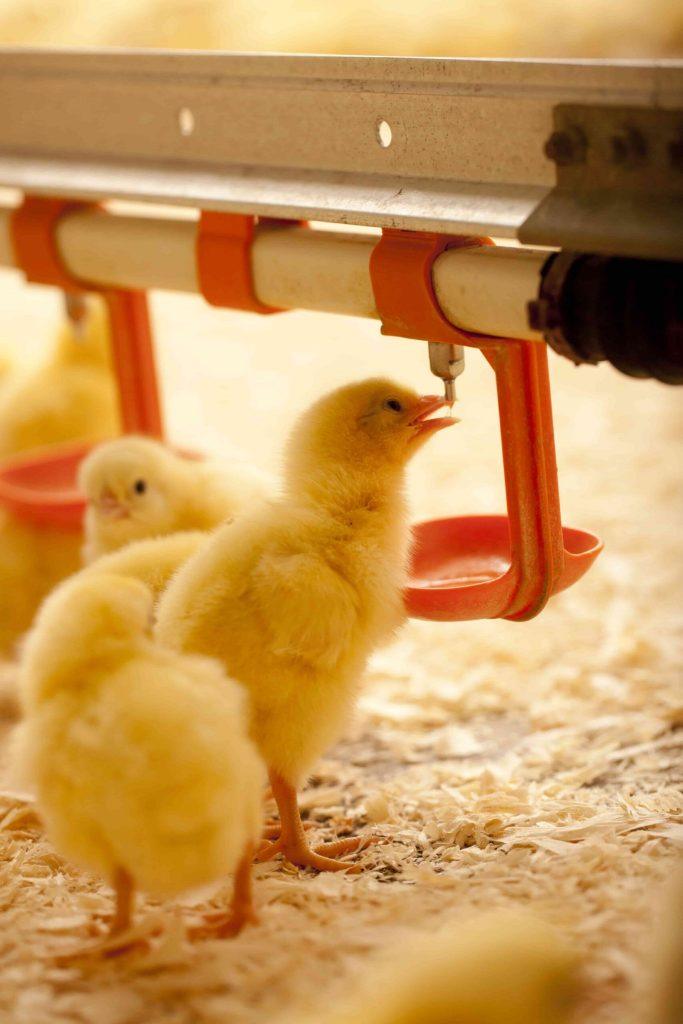
A. Water Consumption
Chicks need clean water right away. It’s even more important than food.
Weekly water needs per chick:
1. Week 1: 0.01 liters/day
2. Week 2: 0.02 liters/day
3. Week 3: 0.03 liters/day
4. Week 4: 0.03 liters/day
Use shallow waterers at first. Chicks can drown in deep water. Add electrolytes and vitamins to the water for the first 2-3 days. This helps them recover from shipping stress.
Check the water constantly. Chicks will tip it over or fill it with bedding. Dirty water spreads disease fast.
B. Feed Consumption
Start feeding chicks after about 2 hours. Give them water first. Use starter feed with at least 20% protein.
Feed needs per chick per day:
1. Week 1: 13 grams
2. Week 2: 18 grams
3. Week 3: 23 grams
4. Week 4: 29 grams
Scatter feed on paper for the first day or two. This helps chicks learn to eat. After that, use proper feeders.
Never let feeders run empty. But don’t overfill them either. Chicks waste feed by scratching it out.
Some farmers add a bit of sand or fine grit after the first week. This helps chicks digest food. Others say chicks on commercial feed don’t need it. Ask your supplier.
5. Floor Space and Density
Crowding kills chicks. They need room to move, eat, and drink without fighting.
A. Chickens – Brooding (0-8 weeks)
1. Floor space: 0.5 square feet per bird
2. Feeder space: 1.5 linear inches per 100 birds
3. Waterer space: 24 linear inches per 100 birds
B. Chickens – Grow-out (8-18 weeks)
1. Floor space: 1 square foot per bird
2. Feeder space: 3.5 linear inches per 100 birds
3. Waterer space: 38 linear inches per 100 birds
C. Chickens – Finishing
Floor space: 2 square feet per bird
D. Turkeys – Brooding (0-8 weeks)
1. Floor space: 1 square foot per bird
2. Feeder space: 2 linear inches per 100 birds
3. Waterer space: 30 linear inches per 100 birds
E. Turkeys – Grow-out (8-18 weeks)
1. Floor space: 2.5 square feet per bird
2. Feeder space: 3 linear inches per 100 birds
3. Waterer space: 60 linear inches per 100 birds
F. Turkeys – Finishing
Hens: 3 square feet
Toms: 5 square feet
G. Outdoor Space (mature birds)
Chickens: 10 square feet per bird
Turkeys: 20 square feet per bird
These are minimums. More space is always better. Check with your chick supplier for breed-specific needs.
Read Also: How to Make Money as a Poultry Farmer
Receiving Chicks

Getting chicks off to a good start matters. Here’s what to do:
1. Clean and disinfect the house: Do this after your last batch. Wait 3-4 weeks before bringing in new chicks.
2. Form a 5-ft diameter brooder guard circle: This holds 200-250 chicks.
3. Place heat source at center: Use an IR bulb, incandescent light, or gas brooder.
4. Spread 2-inch litter: Cover it with old newspaper at first.
5. Arrange feeders/waterers: Set them up in a cartwheel pattern around the heat source.
6. Pre-heat brooder: Turn it on 24 hours before chicks arrive. This stabilizes the temperature.
7. Scatter feed on newspaper: Do this for the first 1-2 days.
8. Provide electrolytes/glucose/vitamins in water: Use these for the first 2-3 days to reduce stress.
9. Moisten beaks: Dip each chick’s beak in water, then place them under the heat right away.
10. Maintain 90-95°F first week: Drop it by 5°F each week after that.
11. Monitor behavior: Watch how chicks act and adjust heat accordingly.
12. Remove newspaper after 3 days: Burn it to prevent disease spread.
13. Remove guard after 7-10 days: Round off shed corners to stop chicks from piling up and smothering each other.
14. Update equipment: Switch to bigger feeders and waterers as birds grow.
15. Lighting: Give 24 hours of light at first (with 1 hour of darkness to train them for power failures).
16. Medication: Days 1-2 use electrolytes/vitamins. Days 3-7 use antibiotics if needed. Follow your vet’s advice.
Summary on Brooding Baby Chicks in Poultry Farming
| Aspect | Key Details |
|---|---|
| Definition | Raising baby chicks with extra heat until they can control their own temperature (usually first 4 weeks) |
| Types | Natural (broody hen) or Artificial (brooders, lamps, stoves) |
| Temperature Schedule | Week 1: 93-95°F (33.9-35°C), drop about 5°F weekly until reaching 70°F |
| Lighting | 20-22 hours/day first 2 days (10 lux), reduce gradually to 12 hours by 8 weeks |
| Brooder Components | Heat source (electric/gas/kerosene/infrared), reflectors (hovers), brooder guard |
| Water Consumption | 0.01 L/chick/day (week 1) to 0.03 L/chick/day (week 4) |
| Feed | Starter ration with 20%+ protein, start after 2 hours, 13 g/day (week 1) to 29 g/day (week 4) |
| Space (Chickens, Brooding) | 0.5 sq ft/bird floor, 1.5 in feeder/100 birds, 24 in waterer/100 birds |
| Receiving Checklist | Clean house, pre-heat, add litter/newspaper, provide electrolytes, watch behavior |
| Common Signs | Huddling means too cold, panting/spreading means too hot, even dispersal means comfortable |
| Risks | Chilling, wet litter hypothermia, overcrowding, drafts |
Frequently Asked Questions About Brooding Baby Chicks in Poultry Farming
1. What is brooding in poultry?
Brooding means providing extra heat and care to baby chicks for the first 4 weeks until they grow feathers and can control their body temperature.
2. How long do chicks need brooding?
Usually the first 4 weeks. Going longer than this can stress them out since their feathers provide enough insulation by then.
3. What is the ideal temperature for day-old chicks?
93-95°F (33.9-35°C) under the brooder edge in week 1. Drop it by about 5°F each week.
4. How can you tell if chicks are too hot or too cold?
Too cold: they huddle tightly. Too hot: they pant, spread out, and look drowsy. Comfortable: they spread out evenly and stay active.
5. What lighting schedule is best for brooding chicks?
20-22 hours of light at low intensity (10 lux) for the first 2 days. Then cut back gradually to around 12 hours by 8 weeks.
6. What are common brooding heat sources?
Electric brooders, infrared bulbs, gas brooders, or charcoal/kerosene stoves. Pick based on what’s available and how many chicks you have.
7. Why is dry bedding important during brooding?
Wet litter causes hypothermia. It’s one of the top reasons chicks die on small farms.
8. When should feed be introduced to day-old chicks?
After the first 2 hours. Give them water first. Then provide a high-protein starter ration freely.
9. How much space do brooding chicks need?
About 0.5 square feet per chick on the floor or in cages for the first 4 weeks. This prevents stress and disease.
10. What should be done immediately after chicks arrive?
Pre-heat the brooder, dip their beaks in water, provide electrolytes/vitamins in water, scatter feed on paper, and watch their temperature and behavior closely.
Do you have any questions, suggestions, or contributions? If so, please feel free to use the comment box below to share your thoughts. We also encourage you to kindly share this information with others who might benefit from it. Since we can’t reach everyone at once, we truly appreciate your help in spreading the word. Thank you very much for your support and for sharing!
Read Also: 9 Impressive Health Benefits of Onions
Very informative for chicks
Thank you… Glad we could help