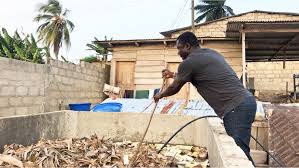
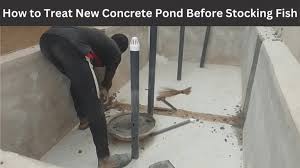
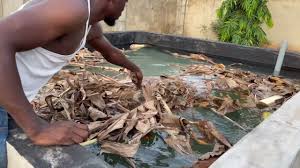
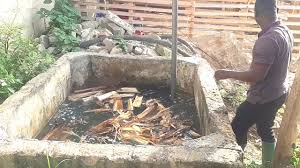
Preparing a concrete pond before stocking it with fish or aquatic plants is a crucial step that ensures a healthy and sustainable environment for the inhabitants. The treatment process involves several key actions that contribute to the establishment of a balanced aquatic ecosystem. Concrete ponds, while durable and long-lasting, present unique challenges compared to natural ponds. The materials used in their construction can leach chemicals that may harm aquatic life if not adequately addressed.
Before stocking, it is essential to thoroughly clean the pond. This includes removing any debris, dust, or residue from the construction process. A thorough cleaning prevents contaminants from entering the water, which could adversely affect the health of the fish. Rinsing the pond with water and scrubbing the surfaces can help eliminate any unwanted materials.
Next, it is important to assess and adjust the pH levels of the pond water. Concrete can raise the alkalinity of water, leading to higher pH levels that may not be suitable for certain fish species. Testing the water with a reliable pH kit can provide insights into the current levels, allowing for adjustments as needed. Ideally, the pH should be within a range suitable for the fish being stocked, usually between 6.5 and 8.5. If the pH is too high, adding substances like peat moss or sulfur can help lower it, creating a more suitable environment for aquatic life.
Another critical aspect of treatment is ensuring the water quality is optimal. This involves testing for ammonia, nitrites, and nitrates, as these parameters are vital indicators of water health. High levels of ammonia or nitrites can be toxic to fish, leading to stress or death. Conducting water tests prior to stocking will allow you to address any potential issues. If harmful levels are detected, performing partial water changes can dilute these compounds, creating a safer environment for the fish.
Additionally, adding beneficial bacteria to the pond can help establish a stable biological filter. These bacteria break down harmful substances, promoting a balanced ecosystem. Many products are available in the market specifically designed for new ponds, which introduce beneficial bacteria to the water. This step can significantly reduce the risk of ammonia spikes, especially during the critical initial period after stocking.
Creating a habitat within the pond is also important for the well-being of the fish. Incorporating natural elements such as rocks, plants, and substrates can provide shelter and breeding grounds, promoting a more natural environment. These elements also aid in maintaining water quality by facilitating the growth of beneficial microorganisms.
Lastly, it’s advisable to monitor the water temperature, as different fish species thrive in specific temperature ranges. Installing a thermometer in the pond can help track this, allowing you to make adjustments if necessary.
The Importance of Treatment for Concrete Ponds
Regular treatment and maintenance of concrete ponds are essential for ensuring their longevity and functionality. Here are some key reasons why treatment is important:
1. Preserving Structural Integrity: Over time, concrete can develop cracks or other forms of damage due to environmental factors, pressure from the water, or settling. Regular treatment helps identify and repair these issues before they worsen, preserving the pond’s structural integrity.
2. Maintaining Water Quality: Concrete surfaces can leach harmful substances into the water if not treated properly. Regular maintenance and the use of suitable sealants help protect water quality, ensuring a healthy environment for aquatic life.
3. Preventing Algae Growth: Algae can quickly proliferate in ponds, especially when exposed to sunlight and nutrients. Treating the pond surface with appropriate cleaners and sealants can reduce algae growth, keeping the water clear and aesthetically pleasing.
4. Enhancing Aesthetics: A well-maintained concrete pond improves the overall appearance of your landscape. Regular treatment helps keep the concrete surface clean and visually appealing, contributing to the garden’s beauty.
5. Reducing Long-term Costs: Regular maintenance can prevent costly repairs and replacements in the future. By addressing small issues promptly, you can extend the life of your concrete pond and reduce overall maintenance expenses.
Assessing the Condition of Your Concrete Pond

Before initiating treatment, it’s crucial to assess the condition of your concrete pond. Here are steps to evaluate its state:
1. Visual Inspection: Look for visible cracks, discoloration, or surface wear. Check for any signs of flaking or chipping in the concrete, as these can indicate underlying issues.
2. Water Quality Testing: Test the water for pH levels, dissolved oxygen, and the presence of harmful substances. Poor water quality can indicate problems with the pond’s structure or filtration systems.
3. Check for Leaks: Inspect the pond for signs of water loss, which could suggest leaks. Monitor the water level over time; a significant drop could mean there is a crack or a joint failure.
4. Evaluate the Surrounding Area: Look for erosion or signs of soil movement around the pond. This could affect the stability of the structure and may require further action.
5. Assess Plant and Animal Life: Observe the health of the aquatic life and plants in the pond. Declining populations can indicate poor water quality or environmental issues linked to the pond’s condition.
Cleaning the Concrete Surface: Steps and Techniques
Cleaning the concrete surface of your pond is vital for maintaining its aesthetics and health. Here’s how to do it:
1. Gather Supplies: You will need a pressure washer, scrub brushes, a pH-neutral cleaner, and possibly a pond-safe algaecide.
2. Remove Debris: Before cleaning, remove any floating debris, such as leaves and twigs, using a net or skimmer. This helps prevent clogging and makes the cleaning process more effective.
3. Pressure Wash the Surface: Using a pressure washer, gently clean the concrete surface. This helps remove dirt, algae, and other buildup. Be careful not to use too much pressure, which could damage the concrete.
4. Scrub Stains: For tough stains or algae spots, use a scrub brush with a pH-neutral cleaner. Apply the cleaner according to the manufacturer’s instructions, and scrub the affected areas thoroughly.
5. Rinse Thoroughly: After scrubbing, rinse the entire surface with water to remove any remaining cleaner or debris. This step is essential to prevent harmful residues from affecting the water quality.
6. Allow to Dry: Let the concrete surface dry completely before refilling the pond. This helps ensure that any cleaning agents are fully washed away.
Removing Algae and Debris from the Pond
Algae and debris can significantly impact the health of your concrete pond. Here are effective methods for removing them:
1. Manual Removal: For small areas of algae, you can manually scrape or scrub the affected spots using a brush. A long-handled brush can help reach deep areas of the pond.
2. Use an Algaecide: If algae growth is significant, consider using a pond-safe algaecide. Follow the manufacturer’s instructions carefully to ensure the safety of aquatic life.
3. Install a Filtration System: A filtration system can help control algae growth by maintaining water quality and circulation. Choose a filter appropriate for the size of your pond.
4. Introduce Beneficial Plants: Adding aquatic plants can help outcompete algae for nutrients, reducing its growth. Choose native species that thrive in your climate for the best results.
5. Regular Maintenance: Schedule regular cleanings and maintenance to prevent excessive algae growth. Routine checks and treatments will keep your pond healthy and visually appealing.
Read Also: 15 Medicinal Health Benefits Of Echinacea purpurea (Purple Coneflower)
Repairing Cracks and Imperfections in the Concrete

Repairing cracks and imperfections in your concrete pond is crucial for maintaining its structural integrity and preventing water loss. Here’s how to effectively address these issues:
1. Identify the Cracks: Begin by thoroughly inspecting the pond for cracks or surface imperfections. Pay attention to both large and small cracks, as even minor issues can lead to more significant problems over time.
2. Clean the Area: Before repair, clean the crack with a wire brush to remove any dirt, algae, or debris. A clean surface ensures that the repair material adheres properly.
3. Choose the Right Repair Material: Select a suitable repair compound designed for concrete. Epoxy or hydraulic cement works well for filling cracks. Ensure that the product is compatible with underwater applications if you plan to refill the pond.
4. Fill the Cracks: Follow the manufacturer’s instructions to mix the repair compound. Use a trowel or putty knife to apply the material into the crack, ensuring it fills completely. Smooth the surface to blend it with the surrounding concrete.
5. Allow to Cure: Let the repair compound cure as per the manufacturer’s guidelines. This step is crucial for the longevity of the repair. Avoid adding water to the pond until the repair has fully set.
6. Inspect Again: Once the repair has cured, check for any additional cracks or imperfections that may need attention. Regular maintenance inspections can prevent future issues.
Sealing the Concrete: Benefits and Methods
Sealing your concrete pond offers numerous benefits, including enhanced durability, reduced maintenance, and improved water quality. Here are the benefits and methods for sealing:
Benefits of Sealing Concrete Ponds
1. Waterproofing: A quality sealant prevents water from penetrating the concrete, reducing the risk of leaks and water loss.
2. Protection Against Algae and Stains: Sealing creates a barrier that helps resist algae growth and staining from organic materials and minerals in the water.
3. Extended Lifespan: Proper sealing can significantly extend the life of your concrete pond by protecting it from wear and tear caused by environmental factors.
4. Easier Maintenance: A sealed surface is easier to clean, requiring less frequent maintenance compared to untreated concrete.
Methods for Sealing Concrete
1. Choose the Right Sealant: Select a sealant specifically formulated for concrete ponds. Options include penetrating sealers and film-forming sealers, depending on your needs.
2. Prepare the Surface: Clean the concrete surface thoroughly before applying the sealant. Ensure that it is free from debris, algae, and any previous coatings.
3. Application: Follow the manufacturer’s instructions for application. Use a roller or sprayer to apply the sealant evenly across the concrete surface. Be sure to coat all areas, including edges and corners.
4. Allow to Cure: Let the sealant cure completely before refilling the pond. This can take several hours to a few days, depending on the product.
5. Reapply as Needed: Regularly check the sealant’s condition and reapply as necessary to maintain optimal protection.
Testing Water Quality Before Stocking
Before introducing fish or other aquatic life into your concrete pond, it’s essential to test the water quality. This ensures a healthy environment for your aquatic inhabitants. Here’s how to perform water quality testing:
1. Gather Testing Kits: Purchase a reliable water testing kit that can measure key parameters, including pH, ammonia, nitrites, nitrates, dissolved oxygen, and hardness.
2. Collect Water Samples: Use a clean container to collect water samples from different areas of the pond. This provides a comprehensive view of the overall water quality.
3. Conduct Tests: Follow the instructions provided with the testing kit. Test for each parameter, noting the results for comparison against ideal levels for your specific fish species.
4. Interpret Results: Compare the test results to standard water quality guidelines for your intended aquatic life. Pay particular attention to pH, ammonia, and oxygen levels, as these are critical for fish health.
5. Take Action if Necessary: If any parameters are outside the recommended range, take corrective actions. For instance, you may need to adjust pH levels or perform partial water changes to improve water quality.
Adjusting pH Levels for Optimal Conditions
Maintaining the right pH level is vital for the health of your pond’s ecosystem. Here’s how to adjust pH levels effectively:
1. Test pH Levels: Use a water testing kit to measure the current pH level of your pond. The ideal pH for most freshwater fish ranges between 6.5 and 8.5.
2. Identify the Cause of pH Imbalance: Factors such as organic matter decay, rainfall, and the presence of certain minerals can affect pH levels. Understanding the cause helps you choose the right adjustment method.
3. Choose the Right Adjusting Agent: If the pH is too low (acidic), you can raise it using baking soda (sodium bicarbonate) or lime. Conversely, if it’s too high (alkaline), you can lower it with products like muriatic acid or aluminum sulfate.
4. Add Adjusting Agents Gradually: Slowly add the chosen agent to the water, spreading it evenly across the pond. Avoid adding too much at once to prevent drastic changes, which can stress aquatic life.
5. Re-test After Adjustments: After a few hours, re-test the pH level to see if it has reached the desired range. Adjust further if necessary, but always do so gradually.
6. Monitor Regularly: Regular pH testing helps maintain optimal conditions for your pond’s ecosystem, ensuring a healthy environment for fish and plants.
Read Also: 15 Medicinal Health Benefits Of Echinacea purpurea (Purple Coneflower)
Adding Beneficial Bacteria for Pond Health

Incorporating beneficial bacteria into your concrete pond can significantly improve water quality and promote a healthy ecosystem. Here’s how to do it effectively:
1. Understand the Role of Beneficial Bacteria: Beneficial bacteria help break down organic waste, reduce harmful substances like ammonia and nitrites, and improve overall water clarity. They are essential for establishing a balanced ecosystem.
2. Choose the Right Product: Look for commercially available beneficial bacteria products specifically formulated for ponds. These products often contain various strains of bacteria, including those that help with decomposition and nutrient cycling.
3. Determine the Correct Dosage: Follow the manufacturer’s recommendations for dosage based on the volume of your pond. Adding the right amount ensures that the bacteria can effectively establish themselves.
4. Introduce Bacteria Gradually: When adding beneficial bacteria, do so gradually to allow the pond’s ecosystem to adjust. Sprinkle the bacteria evenly across the surface of the pond.
5. Monitor Water Quality: After introducing beneficial bacteria, regularly test your pond’s water quality to observe changes in parameters like ammonia and nitrite levels. Adjustments may be needed if levels are still high.
6. Maintain Consistent Conditions: Keep the pond’s temperature and oxygen levels stable, as these factors can influence bacterial activity. Aeration devices or fountains can help maintain oxygen levels.
Introducing Plants to Enhance the Ecosystem
Adding aquatic plants to your concrete pond is a great way to enhance the ecosystem, improve water quality, and provide habitat for aquatic life. Here’s how to introduce plants effectively:
1. Choose Suitable Plants: Select a variety of aquatic plants, including submerged, floating, and emergent species. Some popular choices include water lilies, duckweed, and cattails. These plants not only beautify the pond but also provide shade and oxygen.
2. Plan Your Planting Layout: Design a layout for the plants that balances aesthetics and functionality. Consider factors like light exposure, water depth, and space for fish movement. Grouping plants in clusters can create a natural look and enhance biodiversity.
3. Prepare the Planting Areas: Ensure the pond has appropriate planting areas, such as shallow zones for emergent plants and deeper zones for submerged species. Use planting baskets or pots with soil to secure the plants and prevent them from floating away.
4. Introduce Plants Slowly: Gradually introduce plants to avoid overwhelming the pond ecosystem. Start with a few species and allow them to establish before adding more.
5. Monitor Growth: After planting, regularly check the growth of your plants. Trim back any excessive growth to maintain balance and prevent overcrowding, which can hinder water circulation and reduce oxygen levels.
6. Fertilize Wisely: If needed, use aquatic plant fertilizers to encourage healthy growth. Be cautious not to over-fertilize, as this can lead to algae blooms and water quality issues.
Preparing for Stocking: Final Considerations and Tips
Before introducing fish or other aquatic life to your concrete pond, ensure you’ve taken all necessary precautions. Here are final considerations and tips to prepare for stocking:
1. Confirm Water Quality: Double-check that all water quality parameters, including temperature, pH, ammonia, nitrites, and dissolved oxygen levels, are within acceptable ranges for the species you plan to stock.
2. Choose Compatible Species: Select fish species that are compatible with each other and suited for your pond’s environment. Research the specific needs and behaviors of each species to ensure they can coexist peacefully.
3. Acclimate Fish Gradually: When introducing fish, acclimate them to the pond environment slowly. Start by floating the sealed bag of fish in the pond for about 15-30 minutes to equalize temperature. Then, gradually mix pond water into the bag over another 30 minutes before releasing them into the pond.
4. Monitor Fish Behavior: After stocking, observe the fish closely for signs of stress or aggression. Ensure that they have enough space and hiding spots to feel secure in their new environment.
5. Limit Feeding Initially: After stocking, avoid overfeeding fish. They may be stressed from their new environment, and overfeeding can lead to water quality issues. Start with small amounts of food and gradually increase as they acclimate.
6. Regular Maintenance: Continue to monitor water quality, plant growth, and fish health regularly. Conduct routine maintenance tasks such as cleaning, testing, and adjusting conditions as necessary.
Do you have any questions, suggestions, or contributions? If so, please feel free to use the comment box below to share your thoughts. We also encourage you to kindly share this information with others who might benefit from it. Since we can’t reach everyone at once, we truly appreciate your help in spreading the word. Thank you so much for your support and for sharing!
Read Also: How to Properly Dispose your Torn or Spoilt Plastic Waste Baskets

