
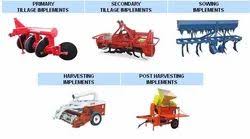
The initial breaking up of the soil is generally referred to as primary tillage. Implements used for primary tillage primarily include various types of ploughs.
Read Also: Apple Maggot: Description, Damages Caused, Control and Preventive Measures
Types of Primary Tillage Implements
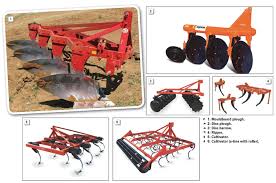
1. Mouldboard Plough: This is one of the oldest tillage tools and is mainly used to invert the soil to cover crop residue. It consists of the following parts:
i. Share: The first part of the plough to enter the soil and cut a furrow slice.
ii. Mouldboard: Lifts the cut soil upwards and inverts it using its curvature.
iii. Landside: Assists in making a neat furrow by pressing against the furrow wall and absorbing the sideways thrust of the plough.
iv. Frog: Joins the share, mouldboard, and landside.
v. Beam: Connects the plough to the power source, typically a tractor.
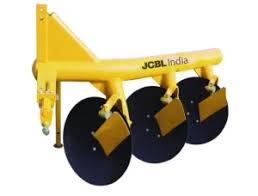
2. Disc Plough: The main component of this plough is a disc with a specific diameter and curvature, mounted on a frame. A disc plough may have several individually-mounted discs, depending on the power available to pull the plough.
Disc ploughs are preferred in dry soils or sticky soils where a mouldboard plough may not work effectively. They are built heavier, and additional weights may be added to aid soil penetration.
3. Subsoiler: A subsoiler is used to break up hard soil pans or compacted layers that result from the continuous use of ploughs. Its legs penetrate the hardpan, improving drainage and aeration. This tool requires a highly powered tractor, often of the crawler type, to pull it through the soil.
4. Chisel Plough: A chisel plough consists of deep tines that operate at significant depths to break open the subsoil, assisting in drainage and removing deep-rooted weeds. Due to the depth at which it operates, the chisel plough is sturdily built and requires considerable power to pull through the soil.
Read Also: How to Farm and Care for Daggertooth Pike Conger Fish (Muraenesox cinereus)
Maintenance and Care of Primary Tillage Implements
- Check the plough for proper alignment of the bottoms.
- Inspect the hitch arrangement of the mouldboard plough for optimal performance.
- Keep the shares on mouldboard ploughs sharp.
- Check the automatic trip for the mouldboard bottom.
- On disc ploughs, check the hitch arrangement for proper plough performance.
- Store implements during the off-season in a shed, on a concrete slab, planks, or blocks.
- Remove wheels with rubber tires and store them in a shed.
- Tag wheels for plough identification and location.
- Apply rust-resistant grease or heavy oil to metal parts to prevent rusting.
- Make a list of any repairs needed and place an order for replacements.
- Cover hydraulic hose ends with plastic, securely tied.
- Cover the implements with a plastic or canvas sheet, securely tied.
This article has discussed the various implements used for primary tillage and the essential maintenance required to ensure their longevity and efficiency. Proper care ensures that these tools provide the desired results and remain functional over an extended period.
Do you have any questions, suggestions, or contributions? If so, please feel free to use the comment box below to share your thoughts. We also encourage you to kindly share this information with others who might benefit from it. Since we can’t reach everyone at once, we truly appreciate your help in spreading the word. Thank you so much for your support and for sharing!
Frequently Asked Questions
We will update this section soon.