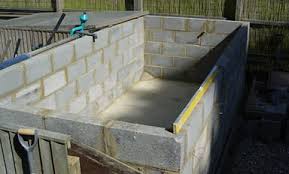
Often time’s farmers always ask how many courses of blocks do I need to raise above the ground level in constructing a concrete pond? Well ideally, the courses of block to be raised above the ground level should be four (4). This is because at this height, the predators like toads, frogs etc. cannot jump and gain access into the fish pond. Also it is not too high and thus making feeding of the fish easy.
The higher the numbers of courses of blocks, the more difficult it becomes to manage the pond, while the lower the number of blocks, the easier it is for predators to gain access to the pond. Construction of concrete fish tank as an enclosure for fish housing could be built using a wide type of materials such as; metals, blocks, cement, gravels or stones and outlets and inlets facilities.
Factors considered before making choice of building a fish pond is;
1. Durability.
2. Strength.
3. Impervious.
4. Permeability.
5. Workability.
6. Dimensional stability.
Concrete mixture is a mixture of cement, fine aggregate commonly called sand, coarse aggregate and gravel (granite) mix together in appropriate proportion with water added to form a paste. Concrete could be plain or reinforced.
Plain concrete is the one without steel rod. Reinforced concrete is the one embedded with steel rod. The steel rod technically called reinforcment bar. The choice either plain or reinforced is the function of specific use. A structure could be plain and reinforced.
Procedure for Constructing Concrete Pond

* Clear site of weeds/vegetation.
* Peg out required area.
* Remove the top soil until a firm lateric basement is reached at about 6.0m.
* Place frame work in the perimeter of dug out area as desirable and fill with fresh concrete mixture of 1:3:6 cement/sand/gravel.
* Arrange coaches of blocks preferably in 4 or 5.
* Insert the flush through pipe at base of tank.
* Plaster the interior.
* Pour water to the brim after two days and check for linkage.
* Treat the new pond two weeks before stocking.
Read Also: Unknown Amazing Benefits of Planting Cassava
Concrete ponds, if properly constructed, can last a lifetime. In addition, they can be constructed with vertical walls to increase the ratio of gallonage to surface area. However, this material is generally expensive and requires much skill to install. If hiring the work done, ask for references and check them.
Hire experience! Whether you or someone else builds a concrete pond, a poorly constructed pond will cost more to maintain, repair or replace than it did to install. This is the main reason for the popularity of the new synthetic construction materials.
The basic construction of a concrete pond follows that of the liner ponds. The concrete should be 4 to 6 inches thick. Once the dimensions are established and an outline laid out, dig out the soil for the entire pond. Forms must be built in place to hold the concrete while it dries and cures.
Concrete reinforcing bars must be cut to size and fitted into the construction. The pond must usually be poured all in one day and in one piece, or if large, in sections. Start with the bottom, then the sides, shelves, and, lastly, the top and any coping around the edge.
Any junctions of ponds poured in sections are critical as the site of future leaks and weakness to the shifting aspects of the soil. An alternative is to pour the pond without forms and simply slope to the walls and pour the concrete thicker to hold the concrete in place.
However, this procedure can produce weakness in the concrete itself due to low density and air pockets as well as being a problem to plant and maintain.
Once the pond is built, it must be treated to correct the basic nature of concrete which would affect the pH of the water. The pH of the water may need periodic adjustments for some time after construction.
Lastly, the color of concrete must be changed for the pond to look right. Apply a pool paint or masonry sealant containing a dark pigment. This will conceal the bottom and moderate the pH of the pond.
Read Also: The Ultimate Step-by-Step Guide to Vegetable Gardening

